Hicache In SGlang
约 7433 个字 363 行代码 6 张图片 预计阅读时间 42 分钟
目录
Overview
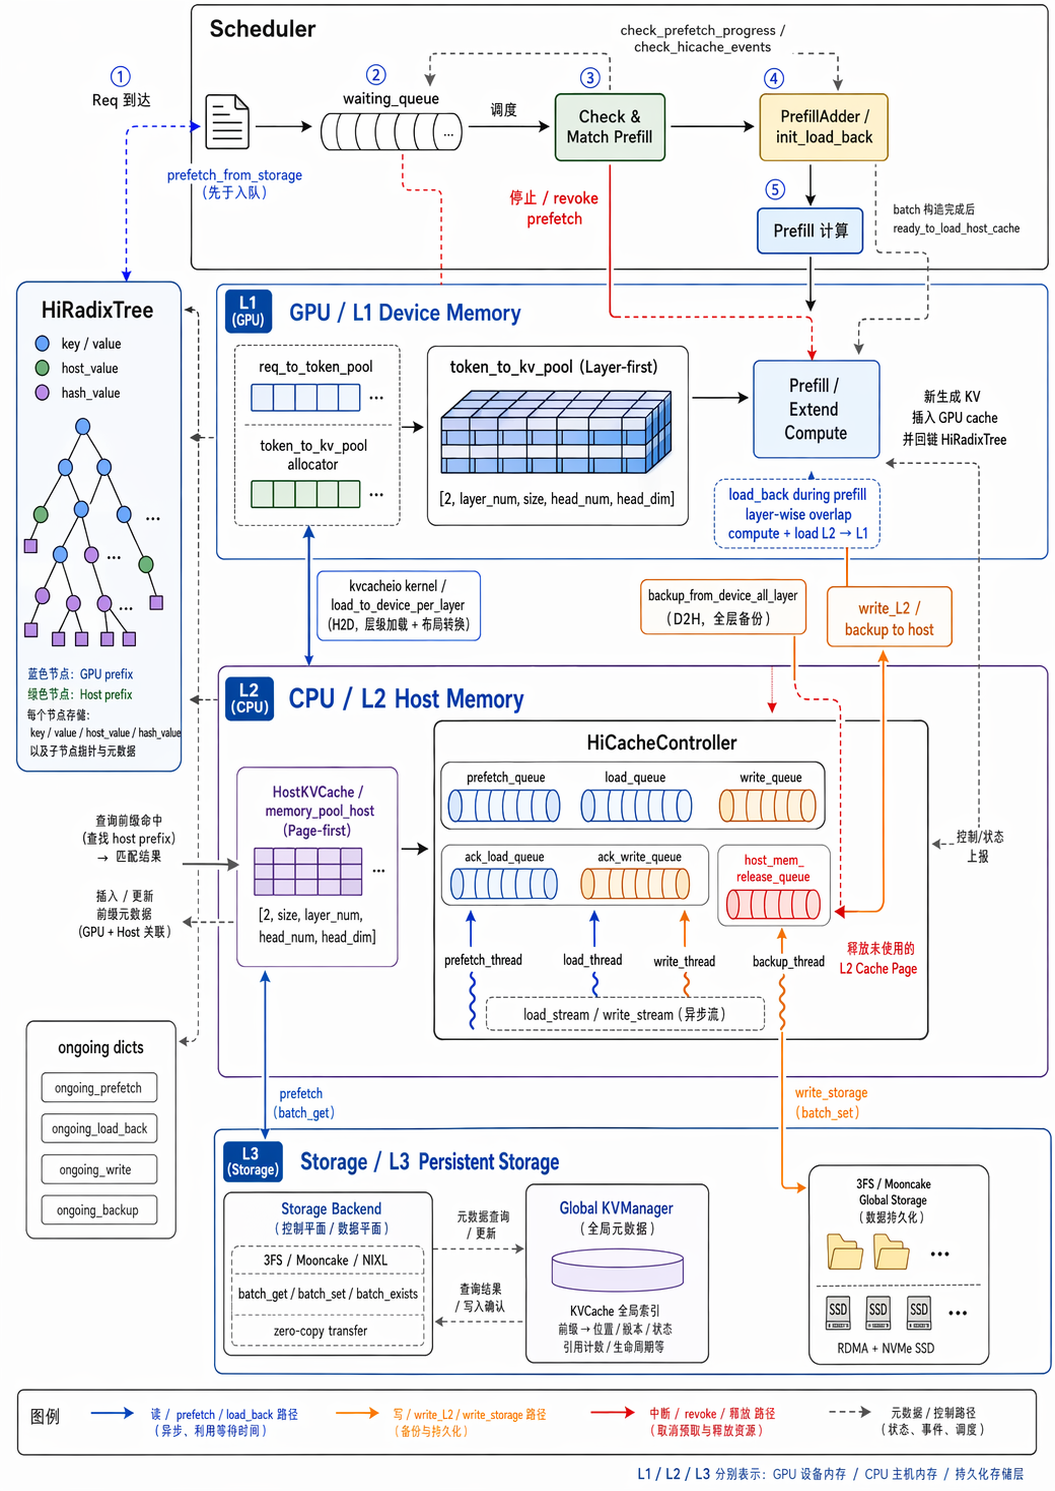
HiCache 即多级 KVCache,架构如下:
- HiRadixTree:单机 GPU-CPU 双层前缀缓存树
- Storage Backend:可插拔存储后端,集成 3FS、Mooncake、NIXL 等
- 统一接口封装
batch_get/batch_set/batch_exists - 零拷贝数据传输
- 统一接口封装
- Global KVManager:提供分布式文件系统(FS)的元数据统一管理服务,具备高效的元数据组织、查询与协调能力,为全局 KVCache 提供一致性管理(KVCache 全局索引)
- 3FS/Mooncake Global Storage:存算分离架构,结合 RDMA 网络优化与 NVMe SSD,提供 TiB/s 级别的聚合读取带宽
核心特点
- 预取与等待并行:请求入队时即触发
prefetch_from_storage,等待调度期间后台线程已经把 Storage 中命中的 KV 数据异步加载到 Host 内存,利用排队等待的空闲时间。- 请求入队时,scheduler 会先通过
match_prefix()找到 L2 挂载点,再把 L2 未覆盖的 suffix 交给 prefetch 线程。 - 请求真正被选入 batch 时,
init_load_back()/load_back()才会把 host 上命中的 KV 分配回 GPU slot,并提交 H2D DMA。 - Scheduler 调度到请求时,会根据调度策略终止 prefetch 或跳过本轮调度:
best_effort:调度到请求时,如果请求仍在 prefetch,则终止 prefetch 并进入推理。timeout:如果 prefetch 耗时超过阈值则终止,否则跳过该请求本轮调度。(推荐)wait_complete:等待 prefetch 完成全部 KVCache 后才进入推理调度,否则跳过。
- 请求入队时,scheduler 会先通过
- 加载与计算 Overlap:请求被调度执行时,Host -> GPU 的 KV 加载通过独立 CUDA Stream 逐层进行。模型前向计算可在第 i 层 KV 就绪后立即开始,无需等待全部层加载完成,实现计算与传输的流水线重叠。
- 计数器注册与绑定:HiCacheController 初始化阶段构建
LayerDoneCounter,记录当前 forward 物理执行到了哪一层。该计数器会分发给多 GPU 并行下的tp_worker.py,保证多卡状态同步。 - 独立的辅助 CUDA 流异步拷贝:内存池 KV 数据的拷贝动作会切分并在独立
alt_stream上触发。 - 计算阻断与同步保障:
LayerDoneCounter内嵌wait(layer_index)接口。主计算流即将计算第l + 1层时,会在 CPU 侧或通过 CUDA Event 调用wait(l + 1);如果辅助流中该层拷贝已经完成,则直接进入计算,否则计算流会短暂同步阻塞直到数据就绪。
- 计数器注册与绑定:HiCacheController 初始化阶段构建
读写流程
HiCache 的读路径可以理解成两段独立轮询、可以重叠执行的异步流水线:
- L3 -> L2:Scheduler 先通过
match_prefix()找到 L2 挂载点,再把 L2 未覆盖的 suffix 交给 prefetch 线程。prefetch 线程先做 hash 计算和 storage existence check,确认命中足够多后,再由 IO 线程把 storage 中的 KV 直接读入预分配的 host memory。 - L2 -> L1:请求真正被选入 batch 时,
init_load_back()/load_back()才会把 host 上命中的 KV 分配回 GPU slot,并提交 H2D DMA。
两段流水线的轮询点不同,但都是 scheduler 每次迭代时进行轮询:
check_prefetch_progress()负责把 L3 prefetch 完成的数据插入 radix treeloading_check()负责检查 H2D DMA 是否完成并释放保护引用。
Load back
- H2D load 和 prefill forward 是 layer-wise 重叠的:第 0 层 KV 搬完后 forward 就可以开始算第 0 层,同时 load stream 继续搬后面的层。
Backup
- Prefill 结束后,新产生的 KV 留在 GPU;如果策略要求 write back / backup,则再按 L1 -> L2 -> L3 的方向异步写回。
Note
这里的 L3 预取和 L2 load back 都需要匹配时超过一个阈值,如果没有超过不会进行这个过程
L3 prefetch 预分配一大段的 host kv slot,实际上可能 IO 线程只填充了一部分,剩余的会放入 host_mem_release_queue 里面。
Mempool Opt
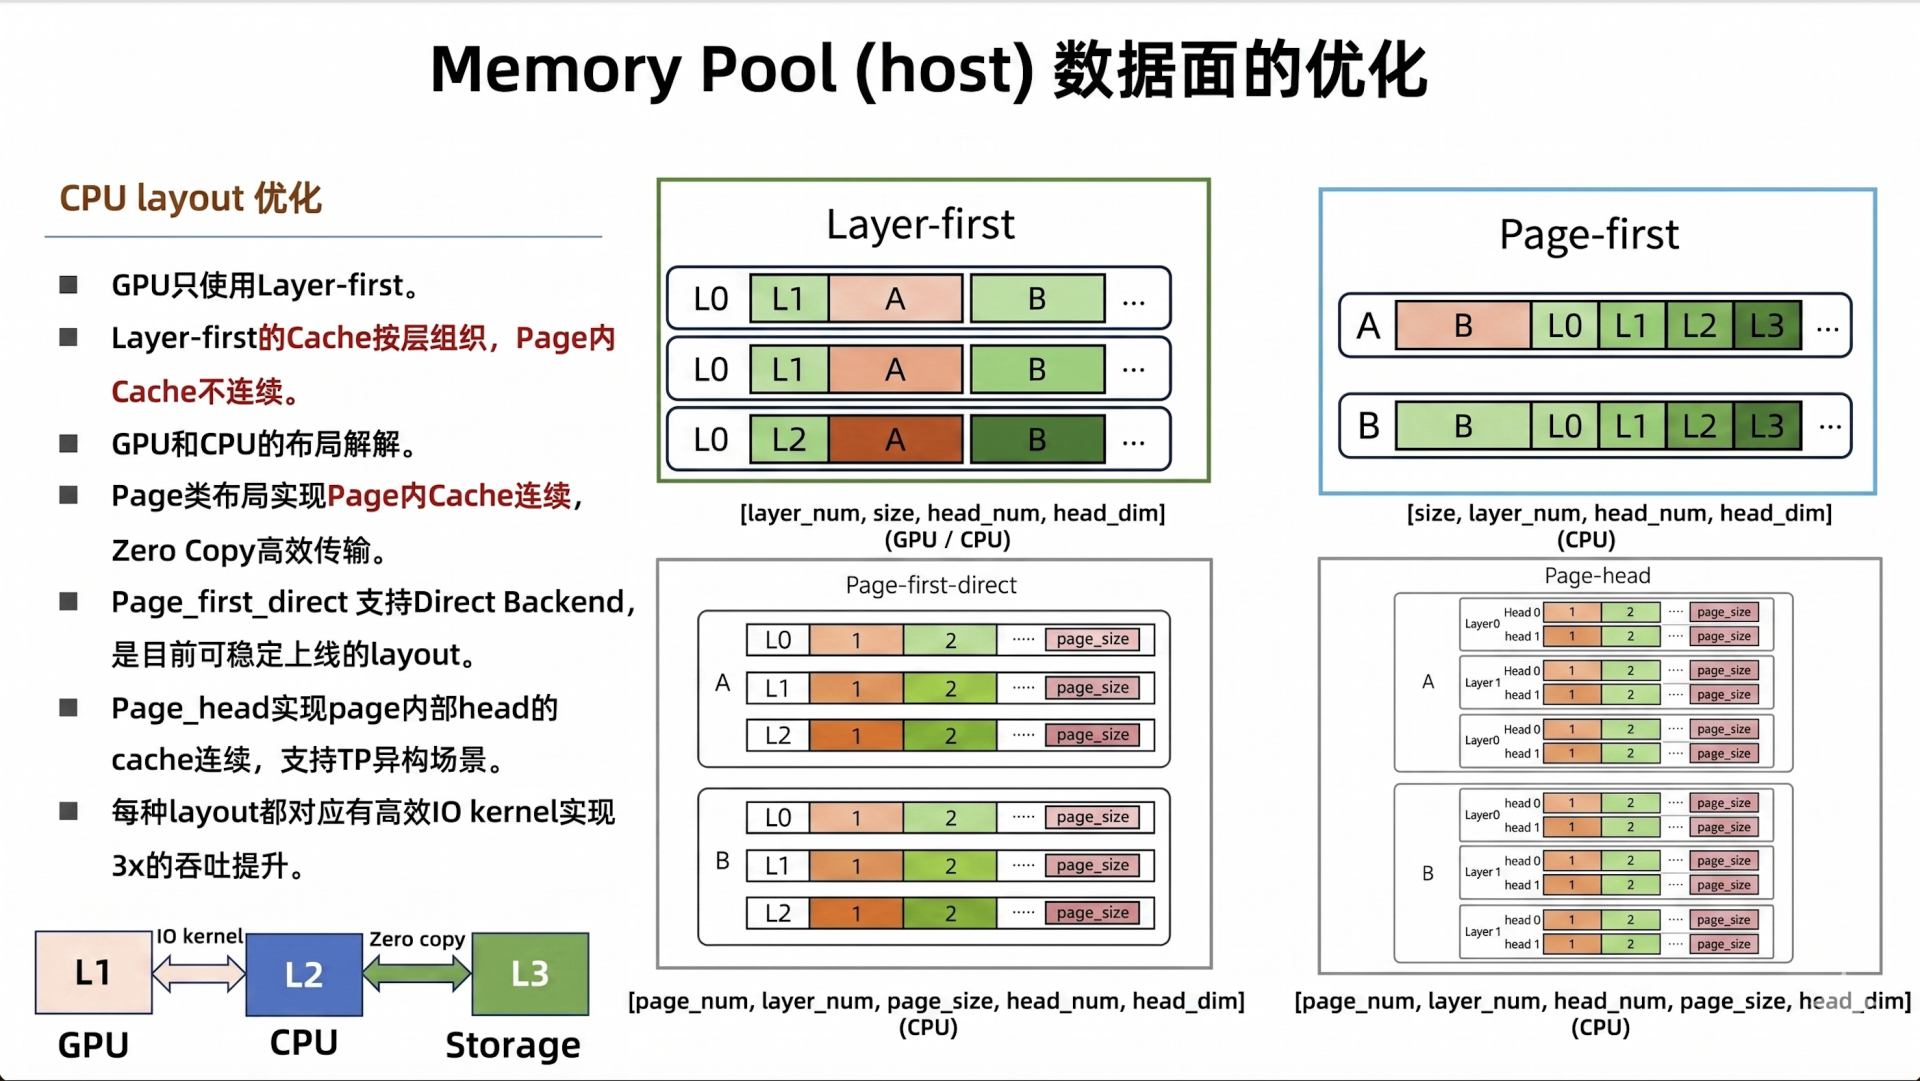
HiCache 采用了解耦的内存布局策略:
- L1 GPU 端:保持“Layer-First”布局,确保与现有的计算算子完全兼容。
- L2 & L3 端:统一采用全新的“Page-First”排布。在 Page-First 模式下,对于一个固定的物理页面(例如 64 个 Token 对应的 Key 和 Value),它在所有模型层(例如 80 层)上的 KV 数据被紧凑、连续地打包存储在 CPU Pinned 内存或远端网络内存中。
主机内存池的内存布局:
page_first:把同一个 token/page 的所有 layer 连起来,方便 L3 I/O。page_first_direct:再进一步按 page_num, layer_num, page_size 组织,让 CPU -> GPU 的 direct transfer 可以按「某 page 的某 layer」聚合。page_head:是后面异构 TP 要用的布局,它把 head 维度提到 page 里面,方便按 head 切分。
CPU 和 GPU 之间 KV 缓存传输的 I/O 后端:
direct:更接近普通 indexing/copy,适合page_first_direct。kernel:走 SGLang 自己的 GPU-assisted I/O kernel,适合page_first、page_head这些需要 layout transform 的路径。
Important
prefix cache 的命中模型决定了 "layer" 不是独立可命中的单位,唯一一个 per-layer 切分有意义的维度是 head(不是 layer)。
L3 的 key 粒度跟着"命中的最小有意义单位"走,而 prefix cache 的最小有意义单位是一页 token 的全部层 KV,只要少一层就得整页重算。
HiSparse
HiSparse 在代码里对应
--enable-hisparse,全称是 hierarchical sparse attention。它和 HiCache 都在做 GPU/Host 分层,但目标不同:HiCache 是 prefix KV cache 的分层复用;HiSparse 是稀疏注意力场景下的 per-request KV 分层,把完整历史 KV 主要放在 Host,只把当前 decode 需要的 top-k KV token/page swap 到 GPU device buffer。
定位与约束
HiSparse 当前主要服务于 DSA(DeepSeek Sparse Attention,例如 DeepSeek V3.2、GLM-5)以及 DeepSeek V4。启动参数在 server_args.py 中:
--enable-hisparse
--hisparse-config '{"top_k": 2048, "device_buffer_size": 4096, "host_to_device_ratio": 2}'
hisparse_config 的核心字段:
| 字段 | 默认值 | 含义 |
|---|---|---|
top_k | 2048 | 每次 decode 稀疏注意力真正读取的历史 KV token/page 数 |
device_buffer_size | 2 * top_k | 每个 request 在 GPU 上保留的热 KV buffer 大小,必须大于等于 top_k |
host_to_device_ratio | 2 | logical KV 空间相对 hisparse device buffer 的放大倍数;越大表示更多 KV 放到 Host,GPU 热区越小 |
algorithm / backend | None | 通用 sparse framework 的算法和 backend adaptor |
page_size / min_sparse_prompt_len | None | 通用 sparse framework 的页粒度和启用阈值 |
代码里有几个硬约束:
validate_hisparse()要求模型是 DSA 或 DeepSeek V4。- DSA 路径上,KV dtype 和 backend 绑定:
bfloat16 -> flashmla_sparse,fp8_e4m3 -> flashmla_kv。 - HiSparse 当前要求
--disable-radix-cache。这是arg_groups/hisparse_hook.py里的显式 assert。 - HiSparse 当前不能和 HiCache 同时开启。原因是 HiCache 要
--enable-hierarchical-cache,而server_args._handle_cache_compatibility()禁止enable_hierarchical_cache && disable_radix_cache;HiSparse 又要求disable_radix_cache。所以从参数校验层就互斥。
核心原理
普通 decode 注意力会从 GPU KV cache 中读完整历史;HiSparse 则把历史 KV 拆成两层:
- Host full history:request 的历史 KV 备份在 Host pool 中,作为完整可恢复的长期存储。
- GPU hot buffer:每个 request 在 GPU 上只有一个较小的
device_buffer,保存最近 token、刚生成 token,以及当前 layer top-k 需要访问的 KV。
一次 decode 的关键路径是:
- DSA indexer 根据当前 query 算出 top-k 历史 token/page 位置。
HiSparseCoordinator.swap_in_selected_pages()根据 top-k 位置检查 GPU hot buffer。- 命中则直接返回 device loc;miss 则从
req_to_host_pool找到 Host KV loc,通过 JIT kernelload_cache_to_device_buffer_*()把该 layer 的 KV 搬入 device buffer。 - 稀疏 attention kernel 使用返回的
top_k_device_locs做 FlashMLA sparse / FlashMLA KV 计算。 - decode 产生的新 KV 先写到 device buffer;满足压缩/页对齐条件后异步 backup 回 Host,保证后续还能被 swap-in。
这里的“hierarchical”不是 prefix 层级,而是同一个 request 内的 KV 生命周期层级:Host 保存完整历史,GPU 保存当前稀疏注意力需要的热子集。
组件组成
1. 参数与校验层
server_args.py:注册--enable-hisparse和--hisparse-config。arg_groups/hisparse_hook.py:选择 DSA backend,并校验模型类型、KV dtype/backend、--disable-radix-cache。mem_cache/sparsity/factory.py:解析SparseConfig,默认top_k=2048、device_buffer_size=4096、host_to_device_ratio=2。
2. 稀疏算法与 backend adaptor
mem_cache/sparsity/core/sparse_coordinator.py 定义了一个通用框架:
RequestTrackers:记录每个 request 是否已经构造稀疏表示、prompt 长度、最后构造到哪个 page。SparseCoordinator:提供on_request_begin()、attention_begin()、attention_end()、forward_begin()、forward_end()生命周期钩子。BaseSparseAlgorithm:抽象出 representation construction、representation update、retrieve_topk()。BackendAdaptor:把算法返回的 logical selected indices 转成具体 attention backend 的 metadata。
不过 DSA HiSparse 的当前实现更直接:DeepSeekDSAAlgorithm.retrieve_topk() 基本把 top-k 选择委托给 DSA 原生 indexer;真正的 Host/GPU 分层管理由 managers/hisparse_coordinator.py 的 HiSparseCoordinator 负责。
3. KV pool 与 allocator
HiSparse 有两套地址空间:
- logical/full KV indices:对 scheduler、req_to_token、普通 KV 语义可见,表示完整序列逻辑位置。
- hisparse device indices:真实落在 GPU hot buffer 中的物理位置。
HiSparseTokenToKVPoolAllocator 同时维护:
logical_attn_allocator:给完整逻辑 KV 空间分配索引。hisparse_attn_allocator:给 GPU hot buffer 分配索引。full_to_hisparse_device_index_mapping:把 logical loc 映射到 hisparse device loc。
对 DSA 模型,device pool 是 HiSparseDSATokenToKVPool。它继承 DSATokenToKVPool,但在 set_mla_kv_buffer() / get_mla_kv_buffer() 前会把 logical loc 翻译成 hisparse device loc。
DeepSeek V4 还有专门路径:DeepSeekV4HiSparseTokenToKVPoolAllocator 包装 SWA/full allocator,同时管理 C4 压缩 KV pool;这里 compress_ratio=4,即多个 full token 对应一个压缩 C4 KV token。
4. Host pool
HiSparse 的 Host 侧不是 HiCache 的 radix tree host backup,而是 request-local 的完整历史 KV 存储:
- DSA 路径使用
MLATokenToKVPoolHost。 - DeepSeek V4 使用
DeepSeekV4PagedHostPool。 HiSparseCoordinator.req_to_host_pool记录每个 request 每个历史 token/page 在 Host pool 中的位置。req_to_host_pool_allocated_len记录每个 request 已经分配/备份到 Host 的长度。
5. HiSparseCoordinator
HiSparseCoordinator 是运行时核心,主要状态包括:
| 状态 | 作用 |
|---|---|
req_to_device_buffer | 每个 request 的 GPU hot buffer slot |
req_device_buffer_size | 每个 request 当前已分配的 hot buffer 长度 |
req_to_host_pool | 每个 request 的 Host KV loc 表 |
req_device_buffer_tokens | 每层、每 request、每 buffer slot 当前缓存的是哪个 token |
req_device_buffer_token_locs | 每层、每 request、每 buffer slot 对应的 device loc |
lru_slots | 每层每 request 的 hot buffer LRU 状态 |
top_k_device_locs_buffer | CUDA graph safe 的 top-k device loc 输出缓冲 |
write_staging_stream / decode_backup_stream | prefill 后 staging 和 decode 后 backup 的异步 copy stream |
工作流程
1. 初始化
启动时:
validate_hisparse()校验模型、dtype/backend、disable_radix_cache。ModelRunner.init_memory_pool()根据enable_hisparse选择HiSparseDSATokenToKVPool和HiSparseTokenToKVPoolAllocator。ModelRunner.initialize()创建HiSparseCoordinator,并把它挂到model_runner.hisparse_coordinator。- Scheduler 初始化后复用 model runner 中的 coordinator,并调用
set_decode_producer_stream(),让 backup stream 可以等待 decode producer stream。
2. Prefill / Extend 阶段
普通非 PD 路径中,prefill 仍然会算完整 prompt 的 KV,但 KV 写入的是 hisparse device pool:
alloc_extend()同时分配 logical indices 和 hisparse device indices。full_to_hisparse_device_index_mapping[logical_indices] = hisparse_indices建立映射。- prefill 结束后,
BatchResultProcessor调用hisparse_coordinator.admit_request_into_staging(req)。 - staging 从
req_to_token_pool取出 request 的 full KV logical indices,翻译成 hisparse device indices。 - Host pool 为该 request 分配对应长度的 host slots。
write_staging_stream异步调用backup_from_device_all_layer(),把 prefill KV 从 GPU hot/device pool 备份到 Host。- Scheduler 不把 last prefill batch 直接 merge 到 running batch,而是调用
collect_ready_reqs()轮询 staging 完成;完成后alloc_device_buffer(req)给该 request 准备 decode hot buffer,再构建 decode batch。
3. Decode 阶段
decode 每步会做两件事:先把新 token 的 buffer/mapping 接好,再在 attention 层按 top-k swap-in。
ScheduleBatch.prepare_for_decode()会调用hisparse_coordinator.map_last_loc_to_buffer()。map_last_loc_to_buffer()先通过_eager_backup_previous_token()把上一个新产生的压缩 token 备份到 Host。- 对普通 DSA 路径,如果序列还短,会增长 request 的 device buffer;如果超过
device_buffer_size,最新 token 走 reserved slot。 - DSA attention backend 调用 indexer 得到
topk_indices。 dsa_backend.py在 decode 时调用hisparse_coordinator.swap_in_selected_pages(req_pool_indices, seq_lens, topk_indices, layer_id)。swap_in_selected_pages()调用 JIT kernelload_cache_to_device_buffer_mla()或load_cache_to_device_buffer_dsv4_mla():- 如果 top-k token 已在 hot buffer,直接返回对应 device loc。
- 如果不在,按
req_to_host_pool找 Host loc,把当前 layer KV 拷到 LRU 选出的 device buffer slot。 - 更新
device_buffer_tokens、device_buffer_token_locs和 LRU。
- FlashMLA sparse / KV backend 使用返回的
top_k_device_locs做实际 attention。
4. PD Decode direct-to-host 路径
PD decode 下还有一个直接写 Host 的路径:
disaggregation/decode.py中,HiSparse 会断言prefix_len == 0,即不走 decode 侧 L1 radix cache。_pre_alloc()使用alloc_logical_only(),只分配 logical indices,不分配 hisparse device indices。- prefill 节点通过 RDMA/传输后端把 KV 直接写入 decode 节点的 HiSparse Host pool。
- decode 侧调用
admit_request_direct(req),只为 request 分配小的 GPU hot buffer;短序列会_preload_to_device_buffer(),长序列则把 hot buffer 标记为空,后续每层按 top-k 从 Host swap-in。
与 RadixCache / HiCache 的关系
| 机制 | 解决的问题 | 共享粒度 | GPU 上保留什么 | Host/Storage 上保留什么 |
|---|---|---|---|---|
| RadixCache | 跨请求 prefix KV 复用 | token/page prefix | 命中的 prefix KV | 默认没有 Host/L3 |
| HiCache | RadixCache 的 L1/L2/L3 分层 | 从 root 开始连续 prefix | L1 命中的 prefix KV | L2 host backup + L3 storage page |
| HiSparse | 单请求长上下文稀疏注意力的 KV 分层 | request 内 top-k token/page | 每个 request 的 hot device buffer | 该 request 的完整历史 KV |
几个关键区别:
- RadixCache / HiCache 是 prefix cache:重点是多个请求之间复用相同前缀。
- HiSparse 是 retrievable sparse attention cache:重点是单个长请求 decode 时只取 top-k 历史 KV。
- HiCache 的 Host/L3 数据必须满足连续 prefix invariant;HiSparse 的 Host 数据是 request-local full history,不要求跨请求 prefix tree。
- HiCache 的 load back 是把 L2/L3 命中的 prefix 恢复成 GPU KV;HiSparse 的 swap-in 是每层按当前 query 的 top-k 动态恢复部分 KV。
能否同时开启
当前代码结论:
- HiSparse + RadixCache:不能同时开启。
validate_hisparse()显式要求server_args.disable_radix_cache。 - HiSparse + HiCache:不能同时开启。 HiCache 要
--enable-hierarchical-cache,但server_args._handle_cache_compatibility()禁止enable_hierarchical_cache && disable_radix_cache;而 HiSparse 又要求disable_radix_cache。 - HiSparse + PD decode radix cache:不能正常共用。 PD decode 的 HiSparse 路径里写了
assert prefix_len == 0,并注释说明 HiSparse incompatible with decode-side L1 radix cache。
因此在当前 SGLang 代码里,HiSparse 和 HiCache 是两条互斥的长上下文 KV 优化路线:HiCache 适合 prefix 复用和分层 KV 存储;HiSparse 适合 DSA/DeepSeek V4 这类稀疏注意力模型,把 decode 的历史 KV 访问变成 top-k retrieval + Host->GPU swap-in。
Component Details
HiRadixTree
RadixAttention 原始模型
普通 RadixAttention 用 radix tree 存 prefix KV。每个节点是一段连续 token:
Tree Node 结构:
  TreeNode.key        # 这段 token span
  TreeNode.value      # GPU KV cache indices
  TreeNode.children   # 后续 token span
  TreeNode.lock_ref   # 正在被请求引用,不能驱逐
匹配请求时,从 root 开始按 token prefix 往下走。命中的节点 KV 可以直接复用,未命中的 suffix 才需要 prefill 计算。
HiRadixTree 增加的状态
HiCache 在同一个 TreeNode 上增加分层状态:
  node.value       # L1: GPU KV indices;None 表示 GPU 已驱逐
  node.host_value  # L2: host KV indices;None 表示 host 没有备份
  node.hash_value  # L3: 每个 page 的 hash key,用来查外部 storage
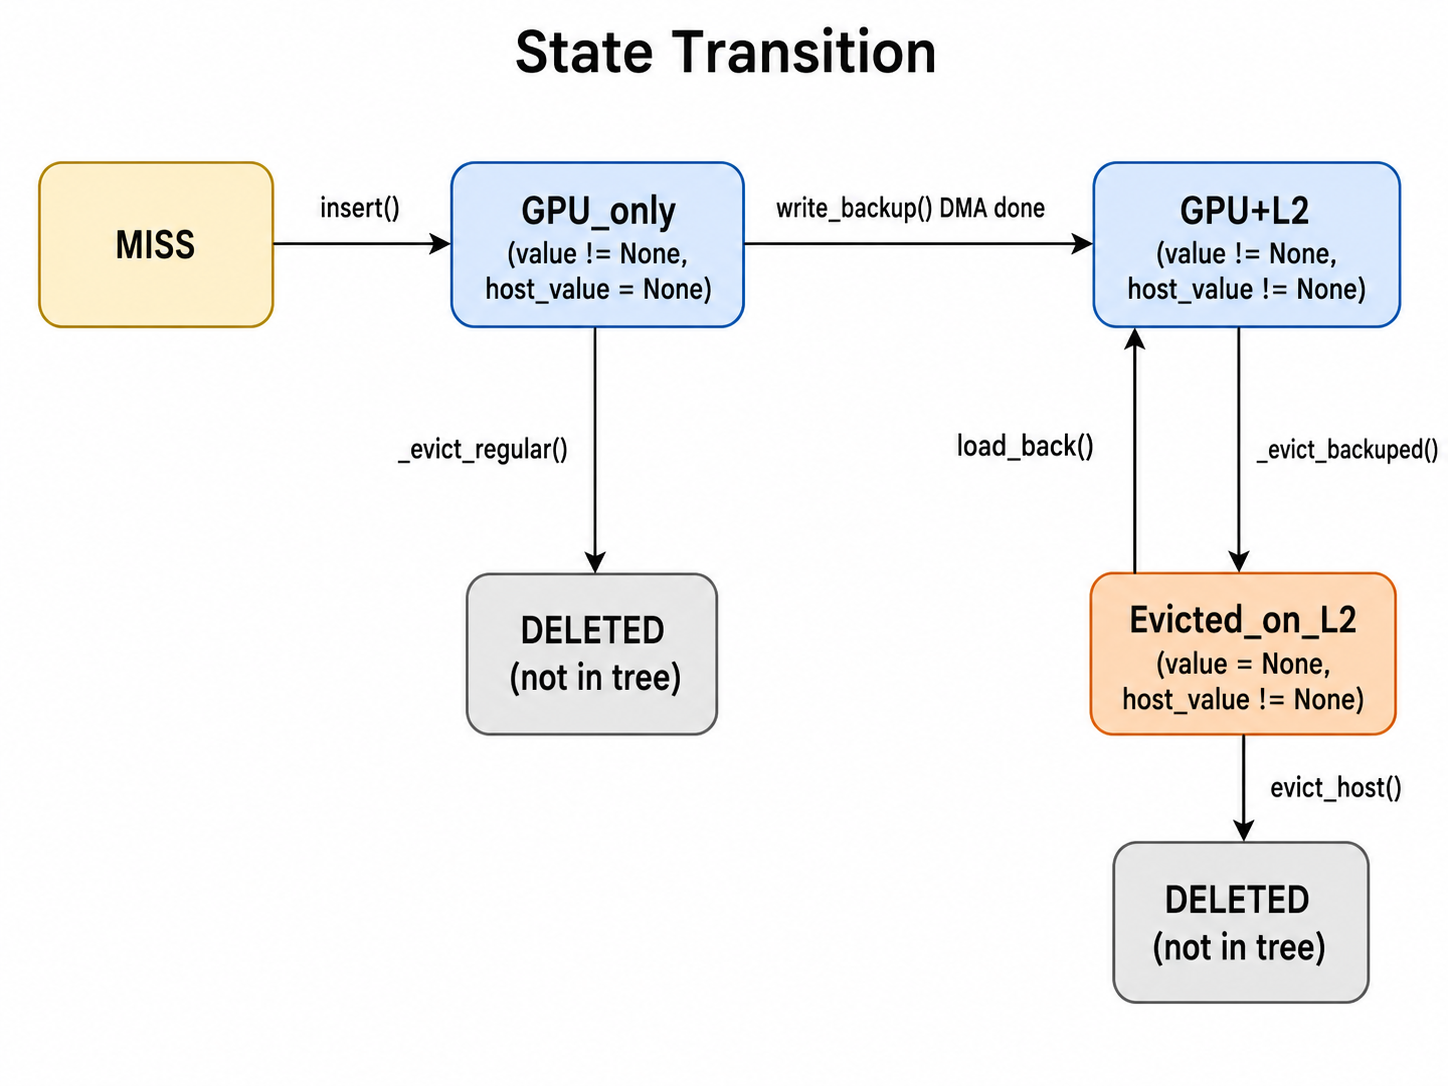
通过 value 和 host_value 的组合来判断节点的状态:
- L1 hit: node.value != None
- L2 hit: node.value == None and node.host_value != None
- L3 hit: node.hash_value != None 且 storage backend 存在对应 hash
- Miss: 以上都没有
这就是分层 radix cache 的本质:tree 结构仍然按 token prefix 组织,但每个节点标记 KV 数据在哪一层
Prefix Match
match_prefix() 是 HiCache 读路径的入口之一。它先调用 _match_prefix_helper() 沿 radix tree 从 root 按 token prefix 向下走,然后再向上走两次,用两个指针分别定位 L1 和 L2 的覆盖范围。
value, last_node = self._match_prefix_helper(self.root_node, key)

# 指针 1:沿 evicted 节点向上走,累加 L2 覆盖的 token 数
host_hit_length = 0
last_host_node = last_node
while last_node.evicted:
    host_hit_length += len(last_node.host_value)
    last_node = last_node.parent

# 指针 2:从原始位置向上走到第一个 backuped 祖先,作为 L2 锚点
while not last_host_node.backuped:
    last_host_node = last_host_node.parent
HiCache 版本的 _match_prefix_helper() 和 base radix cache 的关键区别是:已经 evicted 的节点不会被加入 device_indices,因为它的 GPU KV 已经不在 L1。
# 普通 radix cache:所有匹配节点的 value 都加入结果
value.append(child.value)

# HiCache:evicted 节点跳过,避免返回已经释放的 GPU slot
if not child.evicted:
    value.append(child.value)
返回值可以这样理解:
| 返回值 | 含义 |
|---|---|
device_indices | L1 上已经命中的 GPU KV indices,可以直接复用 |
host_hit_length | L2 上处于 evicted 状态、需要 load back 的 token 数 |
last_host_node | 最深的 L2 备份祖先,也是 L3 prefetch 的挂载点 |
last_device_node | 最后一个未 evict 的 L1 命中节点,用来保护和更新 GPU 驻留状态 |
一个典型例子:
root (backuped)
 └─ Node_A (GPU + backuped)            <- last_device_node / last_host_node
     └─ Node_B (evicted, 128 tok)      <- host_hit_length += 128
         └─ Node_C (evicted, 64 tok)   <- host_hit_length += 64
这次匹配会得到:
device_indices  = Root ... Node_A 的 device value 拼接
host_hit_length = 128 + 64 = 192
last_host_node  = Node_A
这里的直觉是:tree match 负责确认 prefix 结构,device_indices 只返回 L1 上真实存在的 KV;L2 上的 evicted 节点只统计长度,真正 H2D 搬运要等请求进入 batch 后由 init_load_back() 触发。
Insert
HiCache 的 insert() 相比 base radix cache 多了分层状态维护:同一个 token span 可能只在 GPU、只在 host、或者同时在 GPU 和 host。插入时既要维护 radix tree 结构,也要维护 value / host_value / hash_value 三类元数据。
1. 驱逐节点重物化
如果插入路径命中了一个 evicted 节点,说明这个节点的树结构和 L2 备份还在,但 GPU value 已经释放。这次请求重新计算出同一段 KV 后,可以直接把新的 GPU indices 写回该节点。
if node.evicted:
    node.value = value[:prefix_len].clone()
    self.evictable_size_ += len(node.value)
    self._update_leaf_status(node)
    self._update_host_leaf_status(node)
这一步相当于把 Evicted_on_L2 重新 materialize 成 GPU 驻留节点,而不是创建重复节点。
2. 分裂时同时保留 GPU / Host / Hash 状态
当新 key 和已有 child 只有部分 prefix 相同,需要调用 _split_node() 把 parent -> child 拆成 parent -> new_node -> child。
# GPU value 分裂
if child.evicted:
    new_node.value = None
else:
    new_node.value = child.value[:split_len].clone()
    child.value = child.value[split_len:].clone()

# Host value 分裂
if child.backuped:
    new_node.host_value = child.host_value[:split_len].clone()
    child.host_value = child.host_value[split_len:].clone()

# Hash value 分裂
new_node.hash_value, child.hash_value = split_node_hash_value(
    child.hash_value, split_len, self.page_size
)
这里必须同时切分三类 value,否则会破坏分层缓存的 invariant:GPU 上的 token span、L2 备份、L3 page hash 链都要和 radix node 的 key 对齐。
3. 命中计数触发 write-through
插入或复用已有节点后,HiCache 会增加节点的 hit_count。在非 write_back 模式下,如果一个节点被命中到阈值,并且还没有 L2 备份,就会触发 write_backup(),把 L1 KV 写穿到 L2。
def _inc_hit_count(self, node, chunked=False):
    if self.cache_controller.write_policy == "write_back" or chunked:
        return

    node.hit_count += 1
    if not node.backuped and node.hit_count >= self.write_through_threshold:
        self.write_backup(node)
这也是 write_through_selective 的核心:不是所有节点一插入就写到 host,而是热点节点达到阈值后再写。
Host-only 插入
L3 prefetch 完成后走的是 _insert_helper_host(),它不会创建 GPU value,而是把 storage 读出来的数据 materialize 成 L2 节点。
new_node.value = None
new_node.host_value = host_value.clone()
new_node.hash_value = hash_value
self._record_store_event(new_node, medium=StorageMedium.CPU)
这种节点可以看成 host-only tombstone:它在 tree 中占据 prefix 位置,但不占 GPU KV。后续请求命中它时,match_prefix() 会累计 host_hit_length,再由 load_back() 恢复 GPU value。
Eviction
HiCache 有两层驱逐:evict() 处理 L1 GPU KV,evict_host() 处理 L2 host KV。两者的最大区别是:
- L1 驱逐如果有 L2 备份,会保留 tombstone
- L2 驱逐会把 tombstone 从树中彻底删除
L1 Eviction
主入口是 evict()。它从 evictable_leaves 构建最小堆,根据 eviction strategy 选择要驱逐的 GPU 叶子节点。
def evict(self, params):
    leaves = list(self.evictable_leaves)
    heap = [(self.eviction_strategy.get_priority(node), node) for node in leaves]

    while num_evicted < num_tokens and heap:
        _, x = heapq.heappop(heap)
        if x.lock_ref > 0:
            continue

        if not x.backuped:
            if write_policy == "write_back":
                self.write_backup(x, write_back=True)
                write_back_nodes.append(x)
            else:
                self._evict_regular(x)
        else:
            self._evict_backuped(x)
三种 L1 驱逐路径:
| 驱逐方法 | 条件 | 操作 |
|---|---|---|
_evict_backuped() | 已有 host_value | 释放 GPU value,保留树节点和 L2 备份 |
_evict_regular() | 无 host_value 且 write_through | 释放 GPU value,并从树中删除节点 |
| write-back 两阶段 | 无 host_value 且 write_back | 先 write_backup() 写到 L2,再按 backuped 节点降级 |
_evict_backuped():GPU -> CPU 降级
def _evict_backuped(self, node):
    self._record_remove_event(node, medium=StorageMedium.GPU)
    self.cache_controller.evict_device(node.value)
    self.evictable_size_ -= len(node.value)
    node.value = None
    self._update_leaf_status(node)
    self._update_host_leaf_status(node)
    self._update_leaf_status(node.parent)
这个节点不会被删除,host_value 仍然保留在树中。之后再命中同一段 prefix 时,可以通过 load_back() 把 L2 KV 恢复到 GPU。
_evict_regular():完全删除
def _evict_regular(self, node):
    assert len(node.children) == 0
    self._record_remove_event(node)
    self.cache_controller.mem_pool_device_allocator.free(node.value)
    num_evicted = len(node.value)
    self._delete_leaf(node)
    return num_evicted
这种路径没有 L2 备份,因此节点会从 tree 中彻底消失。
L2 Eviction
当 host memory 不够时,evict_host() 会驱逐 L2 上的 host-only tombstone。
def evict_host(self, num_tokens):
    leaves = list(self.evictable_host_leaves)
    heap = [(get_priority(node), node) for node in leaves]

    while num_evicted < num_tokens and heap:
        _, x = heapq.heappop(heap)
        if x.host_ref_counter > 0:
            continue
        if not x.evicted:
            continue

        self._record_remove_event(x, medium=StorageMedium.CPU)
        self.cache_controller.evict_host(x.host_value)
        x.parent.children.pop(key)
        self.evictable_host_leaves.remove(x)

        if len(x.parent.children) == 0 and x.parent.evicted:
            heapq.heappush(heap, (get_priority(x.parent), x.parent))
和 L1 eviction 的关键区别是:evict_host() 释放的是 L2 host_value,并且会把 tombstone 从 radix tree 里删掉;而 _evict_backuped() 只是 node.value = None,保留 L2 可恢复状态。
Evictable Leaf Sets
HiCache 同时维护两组可驱逐叶子集合:
| 叶子集 | 维护函数 | 节点条件 |
|---|---|---|
evictable_leaves | _update_leaf_status() | not evicted、lock_ref == 0、所有 child 都已 evict |
evictable_host_leaves | _update_host_leaf_status() | evicted、lock_ref == 0、没有更深的 evicted child |
设计意图是让两类驱逐都从最深处开始:
- GPU evict 从最深的 GPU 叶子开始,避免先驱逐父节点导致 GPU child 失去前缀结构。
- L2 evict 从最深的 tombstone 开始,因为更深的 evicted node 应该先被删除。
每次 insert、split、evict、load back 后,都要更新这两组集合,否则后续驱逐候选就会不准确。
State Transition
核心设计原则有三个:
- Backup invariant:父节点不备份,子节点不能备份;L2 上的节点必须形成从 root 开始的连续 prefix。
- Tombstone 保留:有 L2 备份的驱逐节点保留在树中,后续
load_back()可以恢复;只有evict_host()才会最终删除。 - 叶子驱逐 + 父级级联:永远从叶子开始驱逐,驱逐后父节点可能变成新的叶子,再加入候选堆。
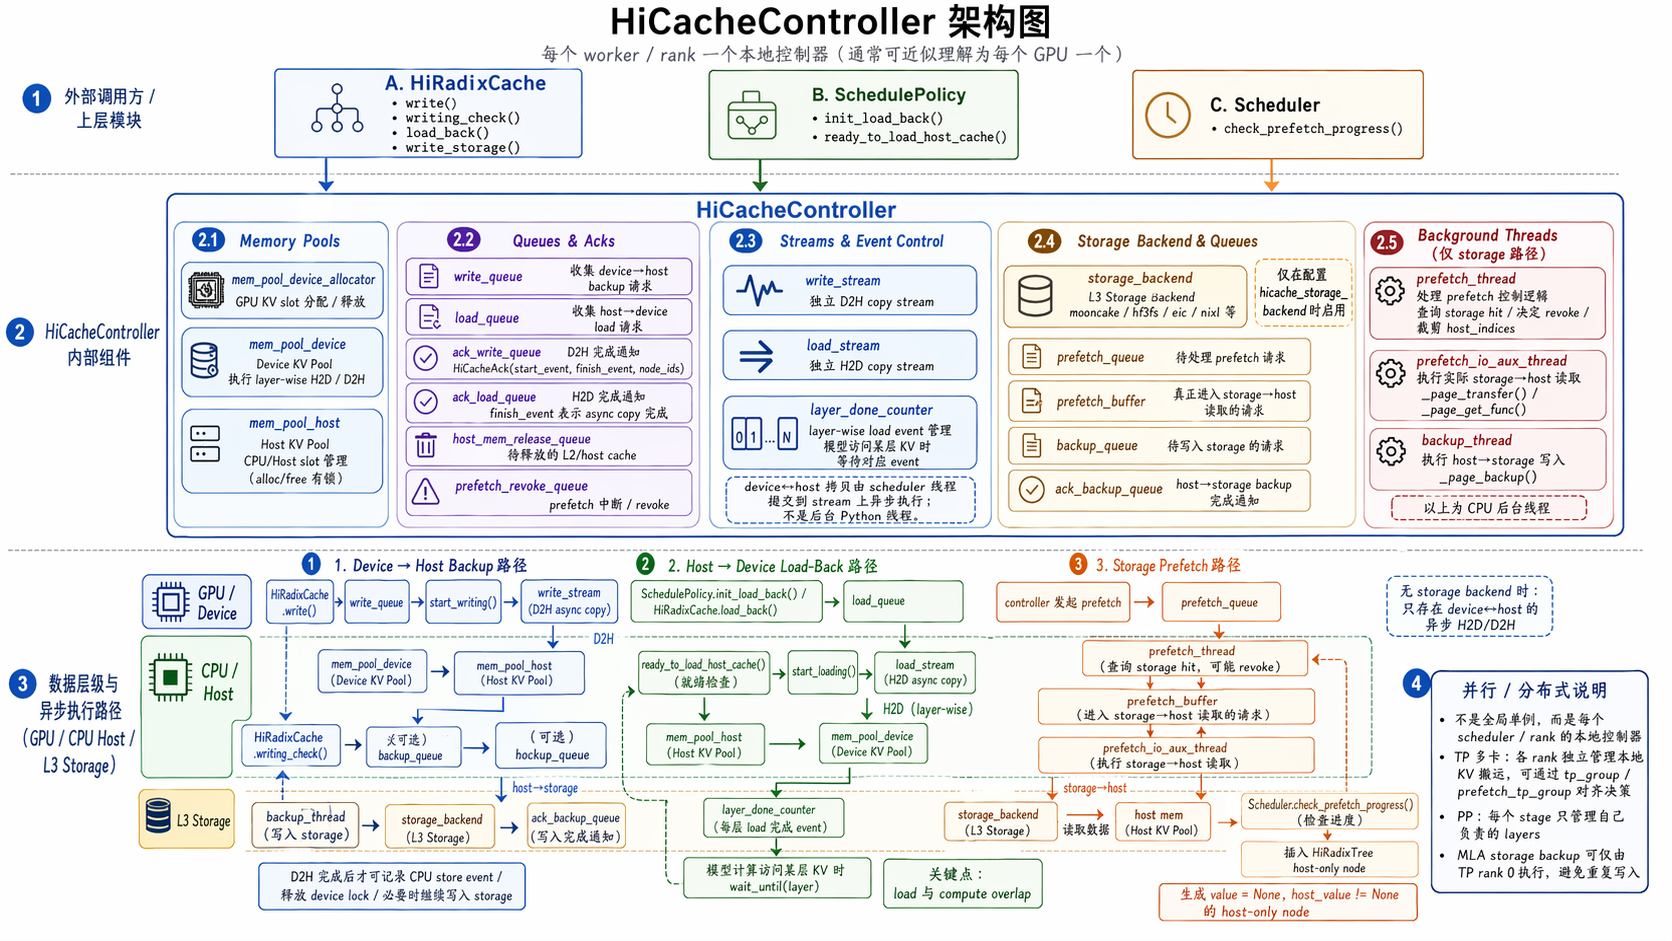
HiCacheController
初始化路径:Scheduler -> HiRadixCache -> HostKVCache -> HiCacheController
- 每个 rank 都有一个 HiCacheController 实例,负责管理本地 HiRadixTree 和与 storage backend 的交互。
- memory device pool 管理 GPU 池,memory host pool 管理 host 池
- 多个队列存放不同请求,scheduler 每次调度都会 check 这些队列状态并清除完成的请求:
- write_queue:L1->L2 写请求
- ack_write_queue:L1->L2 写完成 ack
- load_queue:L2->L1 读请求
- ack_load_queue:L2->L1 读完成 ack
- prefetch_queue:L3 预取请求
- prefetch_revoke_queue:L3 预取撤销请求
- host_mem_release_queue:host 内存释放请求
- backup_queue:L2->L3 写请求
- ack_backup_queue:L2->L3 写完成 ack
- 后台线程和多流:
- copy stream:专门用于 GPU<->host 的异步 copy,配合 CUDA event 实现非阻塞的 load/write 操作;每一层记录一个 CUDA event,实现 layer-wise 的 load/prefill 重叠。
- prefetch_thread:负责 L3 prefetch 的元数据查询和命中判断
- prefetch_io_aux_thread:负责 L3->L2 的实际数据搬运
- backup_thread:负责 L2->L3 的写入操作
Device->Host->Storage Backup
写入策略
- write_through:命中/插入后尽快写到 L2/L3,缓存收益最大,I/O 压力也最大。
- write_through_selective:命中次数达到阈值后才写,偏向热点数据。
- write_back:GPU 驱逐时才写到 host/L3,减少 I/O。
Device->Host Backup
HiCacheController 将 host_indices 放入 write_queue,然后 merge_ops 把队列中多个写操作合并成一个批量操作:
1. 拼接 tensor:把多个 host_indices 和 device_indices 张量拼接成一个大 tensor
2. 收集 node_ids:把所有请求的 node_id 汇总
3. 取最小 priority:使用最低优先级
4. 合并 pool_transfers:合并内存池传输信息
5. 然后 node.value 对应的 GPU KV 拷到 host pool:
Important
对 write_through 有一个重要约束:host 备份必须形成从 root 开始的连续 prefix,不能父节点没备份而子节点先备份。
Host->Storage Backup
递归获取祖先的 hash value,直到 root,形成当前节点的 hash_value。然后把 host KV 和 hash_value 作为一个 StorageOperation 放入 backup_queue,由 backup_thread 负责写回 storage。
- Zero-copy backend(Mooncake、NIXL、EIC、SiMM、HF3FS 等):通过 batch_set_v1() 直接传 host memory 指针或 buffer view,backend 从 L2 buffer 读出并写到远端。
- Generic-copy backend(File、AIBrix 等):通过 batch_set() 先构造 tensor / block handle,再由 backend 写入本地文件或远端 KV manager。
完成的 backup 回放入 ack_backup_queue,由 scheduler drain 并更新节点状态。
Storage -> Host -> Device Load Back
Storage -> Host -> Device 是一条两段异步流水线:
- L3 -> L2:
prefetch_thread做 hash 计算和 storage 命中查询,prefetch_io_aux_thread做真正的 storage -> host 数据搬运。 - L2 -> L1:Scheduler 主线程触发
load_back(),load_stream按 layer 做 host -> device DMA。 - 两段互相独立:都由 scheduler 每次迭代后进行轮询;L3 prefetch 通过
check_prefetch_progress()轮询,L2 load back 通过loading_check()轮询,因此可以和调度、prefill 计算重叠。
第一阶段:L3 -> L2(Storage -> Host Prefetch)
Step 1:match_prefix() 确定 L2 覆盖范围
位置:hiradix_cache.py:1218-1252
请求进入 radix tree 后,match_prefix() 会返回三个和 HiCache 读路径相关的值:
# 沿 parent 向上走,统计 evicted 节点在 L2 上的 token 数
while last_node.evicted:
    host_hit_length += len(last_node.host_value)
    last_node = last_node.parent

# 沿 parent 向上走,找第一个 backuped 祖先,作为 L3 prefetch 挂载点
while not last_host_node.backuped:
    last_host_node = last_host_node.parent
| 返回值 | 含义 |
|---|---|
device_indices | GPU 上已经命中的 prefix,可直接复用 |
last_host_node | 最深的 L2 备份节点,也是 L3 prefetch 结果插入 radix tree 的挂载点 |
host_hit_length | L2 上处于 evicted 状态的 token 数,后续需要 load back 到 GPU |
这里有个关键约束:prefetch 结果最终要插入 radix tree,因此必须先找到一个已经 backuped 的 L2 祖先节点作为挂载点。
Step 2:_prefetch_kvcache() 触发 L3 prefetch
if last_host_node.backuped or last_host_node is self.tree_cache.root_node:
    new_input_tokens = req.fill_ids[matched_len:]
    self.tree_cache.prefetch_from_storage(
        req.rid, last_host_node, new_input_tokens, last_hash, prefix_keys
    )
new_input_tokens 是 L2 尚未覆盖的 suffix。只有 last_host_node.backuped,或者挂载点退化到 root_node 时,Scheduler 才会发起 storage prefetch。
Step 3:prefetch_from_storage() 分配 L2 host memory 并入队
def prefetch_from_storage(self, req_id, last_host_node, new_input_tokens, ...):
    prefetch_length = len(new_input_tokens) - (len(new_input_tokens) % self.page_size)

    if not self.enable_storage or prefetch_length < self.prefetch_threshold:
        return

    last_host_node.protect_host()
    host_indices = self.cache_controller.mem_pool_host.alloc(prefetch_length)
    operation = self.cache_controller.prefetch(
        req_id, host_indices, new_input_tokens, ...
    )
    self.ongoing_prefetch[req_id] = (
        last_host_node, new_input_tokens, host_indices, operation
    )
这一步还没有做真正 I/O,只是完成三件事:
- 按
page_size对齐计算prefetch_length。 - 保护 L2 父节点,避免 prefetch 期间挂载点被 evict。
- 预分配 host memory,并创建
PrefetchOperation放入prefetch_queue。
如果 storage 没启用、命中长度低于 prefetch_threshold,或者 host pool 已经接近限流阈值,这里会直接短路返回。
Step 4:prefetch_thread_func() 做 hash 查询,IO 线程做数据搬运
prefetch_thread 是第一层后台线程,它从 prefetch_queue 取出 operation 后,先做 hash 计算和 existence check:
def prefetch_thread_func(self):
    while not stopped:
        operation = self.prefetch_queue.get(block=True)
        hash_value, storage_hit_count = self._storage_hit_query(operation)

        if storage_hit_count < self.prefetch_threshold:
            self.prefetch_revoke_queue.put(operation.request_id)
        else:
            self.prefetch_buffer.put(operation)
_storage_hit_query() 会按 page 做链式 SHA256。每个 page 的 hash 依赖上一个 page 的 hash,因此它天然表达的是 longest-prefix 语义:
for start in range(0, len(tokens), page_size * storage_batch_size):
    batch_tokens = tokens[start:end]
    for i in range(0, len(batch_tokens), page_size):
        last_hash = self.get_hash_str(batch_tokens[i:i + page_size], last_hash)
        batch_hashes.append(last_hash)

    hit_page_num = self.storage_backend.batch_exists(batch_hashes, extra_info)
    storage_query_count += hit_page_num * self.page_size
    if hit_page_num < len(batch_hashes):
        break
如果本 rank 查询到的命中长度足够,TP ranks 之间还会通过 all_reduce(MIN) 对齐命中长度。随后 operation 被放进 prefetch_buffer,交给 IO 辅助线程做真正的数据搬运。
def prefetch_io_aux_func(self):
    while not stopped:
        operation = self.prefetch_buffer.get(block=True)
        self._page_transfer(operation)

def _page_transfer(self, operation):
    for i in range(0, len(operation.hash_value), storage_batch_size):
        batch_hashes = operation.hash_value[i:i + storage_batch_size]
        batch_host_indices = operation.host_indices[
            i * page_size:(i + storage_batch_size) * page_size
        ]
        results = self.storage_backend.batch_get_v1(
            batch_hashes, batch_host_indices
        )
batch_get_v1() 是零拷贝读路径的关键:storage backend 会把数据直接写入前面预分配好的 host KV memory。
- 比如 Mooncake backend 可以通过 batch_get_into(keys, buffer_ptrs, buffer_sizes) 直接把远端数据 RDMA 到 host buffer。
Step 5:check_prefetch_progress() 轮询并把完成结果插入 radix tree
Scheduler 每轮调度都会检查 prefetch 进度:
def check_prefetch_progress(self, req_id):
    _, token_ids, host_indices, operation = self.ongoing_prefetch[req_id]

    if not self.can_terminate_prefetch(operation):
        return False

    completed_tokens, hash_value = self.cache_controller.terminate_prefetch(operation)

    matched_length = self._insert_helper_host(
        last_host_node, key, host_indices[:completed_tokens], hash_value
    )
    loaded_from_storage = completed_tokens - matched_length
    self.prefetch_loaded_tokens_by_reqid[req_id] = loaded_from_storage

    last_host_node.release_host()
    del self.ongoing_prefetch[req_id]
    return True
_insert_helper_host() 会沿 radix tree 向下复用已有节点,剩余部分创建新的 host-only 节点:
因此,completed_tokens 表示本轮 prefetch 实际完成的 token 数,matched_length 表示这些 token 中已经在 tree 里的前缀长度,真正从 L3 新加载的是:
--hicache-storage-prefetch-policy 控制 prefetch 何时可以终止:
| 策略 | 行为 |
|---|---|
best_effort | 立即终止,有多少用多少 |
wait_complete | 等所有 page 完成 |
timeout | 等完成或超时,超时时间通常是 base_timeout + per_page * num_pages |
第二阶段:L2 -> L1(Host -> Device Load Back)
Step 6:init_load_back() 触发 H2D load
当请求被选入 batch 时,Scheduler 才真正触发 L2 -> L1:
if req.host_hit_length > 0:
    new_indices, req.last_node = self.tree_cache.init_load_back(
        InitLoadBackParams(
            last_host_node=req.last_host_node,
            host_hit_length=req.host_hit_length,
            req=req,
        )
    )
    req.prefix_indices = torch.cat([req.prefix_indices, new_indices])
这里的 host_hit_length 可能来自两个地方:
match_prefix()在 L2 已有节点中统计到的evictedtoken。check_prefetch_progress()刚从 L3 prefetch 并插入 radix tree 的 host-only 节点。
Step 7:load_back() 从 host 恢复到 GPU
def load_back(self, node: TreeNode, mem_quota=None):
    nodes_to_load = []
    while node.evicted:
        assert node.backuped, "No backup available on evicted nodes"
        nodes_to_load.insert(0, node)
        node = node.parent

    ancester_node = node
    self.inc_lock_ref(ancester_node)

    host_indices = torch.cat([n.host_value for n in nodes_to_load])
    device_indices = self.cache_controller.load(
        host_indices=host_indices, node_id=last_hit_node.id
    )

    offset = 0
    for node in nodes_to_load:
        node.value = device_indices[offset:offset + len(node.host_value)].clone()
        offset += len(node.host_value)
        node.evicted = False
这一步主要是在 radix tree 和 KV pool 的 index 层面完成恢复:
- 从当前节点向上收集连续的
evicted节点。 - 找到第一个未 evict 的祖先作为锚点,并增加
lock_ref,防止 load 过程中被驱逐。 - 拼接所有
host_value,分配 GPU KV slot。 - 把新分配的
device_indices切回各个节点,更新node.value并把node.evicted置为False。
Step 8:start_loading() 逐层异步 H2D DMA
def start_loading(self):
    op = CacheOperation.merge_ops(self.load_queue)
    host_indices, device_indices = self.move_indices(
        op.host_indices, op.device_indices
    )

    with device_module.stream(self.load_stream):
        for i in range(self.layer_num):
            self.mem_pool_host.load_to_device_per_layer(
                self.mem_pool_device,
                host_indices,
                device_indices,
                i,
                self.io_backend,
            )
            producer_event.complete(i)

    self.ack_load_queue.append(ack)
关键优化是 LayerDoneCounter:每拷贝完一层,就通知 forward pass 这一层的 KV 已可用。这样 forward 计算第 i 层时,load stream 可以继续搬第 i + 1 层甚至更后面的 KV,实现计算和数据传输重叠。
Step 9:loading_check() 轮询 DMA 完成
实际上在 check_hicache_events() 里面,scheduler 每轮都会做这件事
def loading_check(self):
    for _, finish_event, ack_list in self.cache_controller.ack_load_queue:
        if not finish_event.query():
            break

        for ack_id in ack_list:
            end_node = self.ongoing_load_back.pop(ack_id)
            self.dec_lock_ref(end_node)
当 CUDA event 表示 load 已完成后,Scheduler 会从 ack_load_queue 中取回对应节点,并释放前面为了保护锚点而增加的 lock_ref。
Global KVManager 与 Storage Backend
HiCacheController 不直接关心底层是 Mooncake、NIXL、EIC、SiMM、HF3FS、AIBrix 还是本地 File。它把 L3 I/O 抽象成三类接口:
batch_exists(keys):检查一批 page hash 是否存在,返回连续命中的 page 数。batch_get/batch_get_v1:把 L3 中的 KV page 读到 L2 host memory。batch_set/batch_set_v1:把 L2 host memory 中的 KV page 写回 L3。
_v1 接口表示 backend 可以直接接收 host memory indices 或指针,优先走零拷贝路径;非 _v1 接口则走通用 copy 路径。
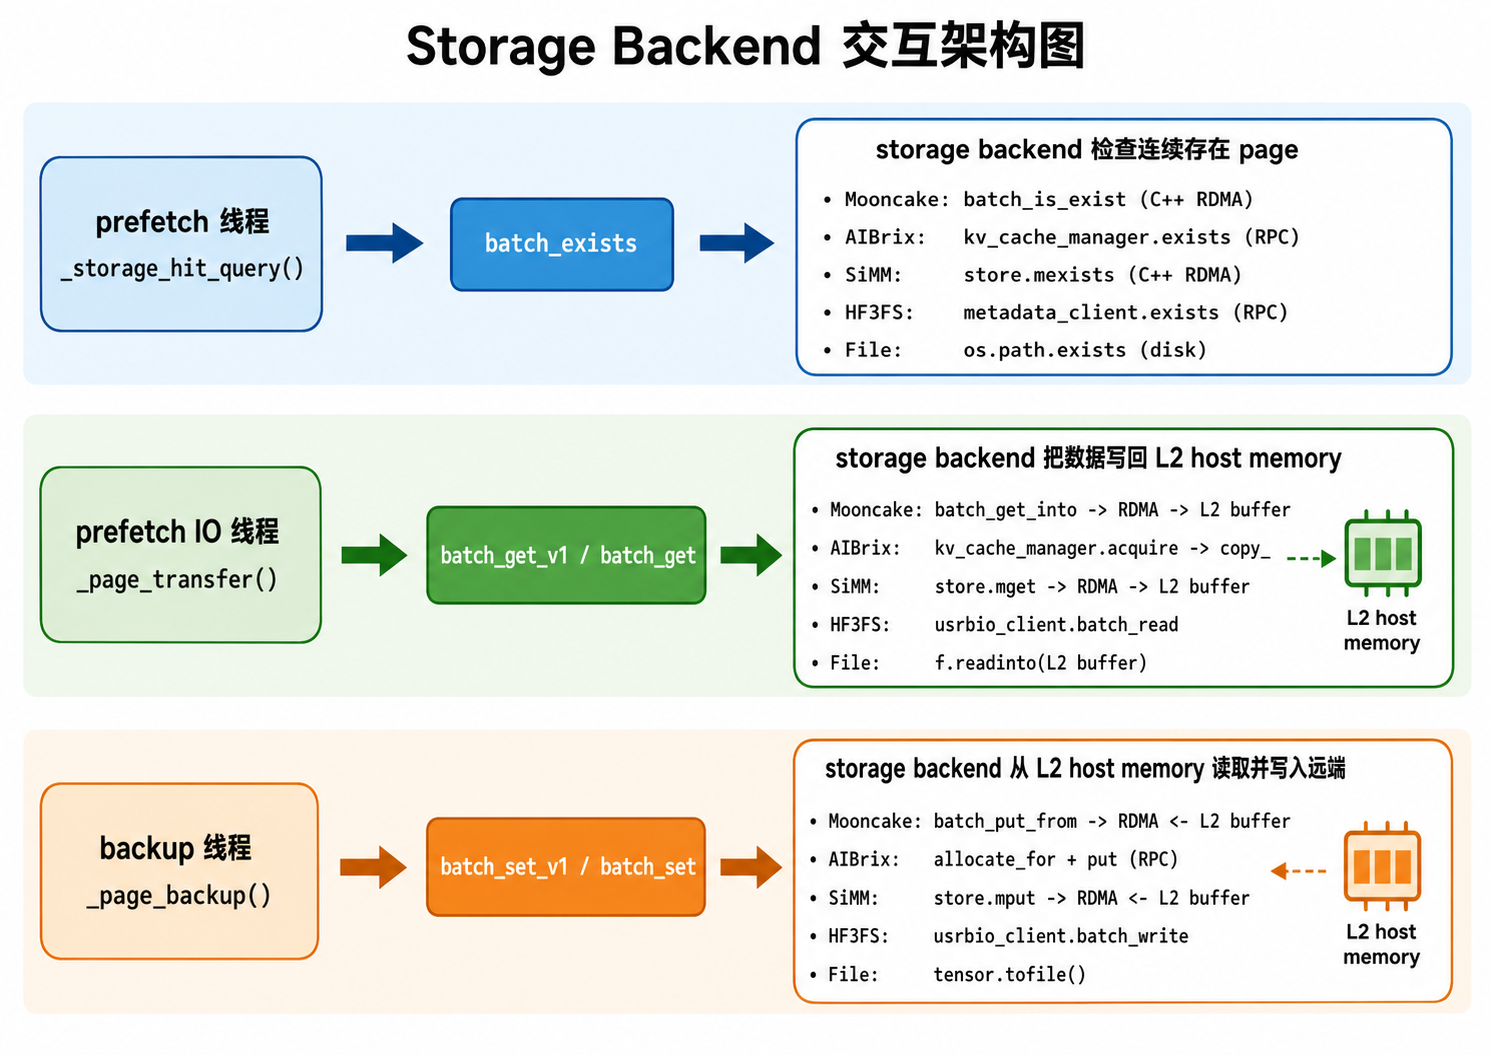
Zero-copy 与 Generic Copy 分发
零拷贝分发
Mooncake、NIXL、EIC、SiMM、HF3FS 这类 RDMA / usrbio 风格 backend 可以直接拿到预分配 L2 host memory 的地址。读路径中,backend 直接把远端数据写进 host_indices 指向的 buffer;写路径中,backend 直接从这些 buffer 读取并发送到远端。
def _page_get_zero_copy(self, operation, hash_values, host_indices, extra_info):
    results = self.storage_backend.batch_get_v1(
        hash_values, host_indices, extra_info
    )
    # host_indices 指向预分配的 L2 host memory,backend 直接往里写数据

def _page_set_zero_copy(self, hash_values, host_indices, extra_info):
    return all(
        self.storage_backend.batch_set_v1(hash_values, host_indices, extra_info)
    )
拷贝模式分发
File、AIBrix 这类 backend 通常先返回普通 tensor / block handle,再由 controller 或 manager 把数据 copy 到目标 host page。
def _generic_page_get(self, operation, hash_values, host_indices, extra_info):
    page_data = self.storage_backend.batch_get(hash_values, dummy_page_dst)
    for i in range(len(hash_values)):
        mem_pool_host.set_from_flat_data_page(
            host_indices[i * page_size], page_data[i]
        )

def _generic_page_set(self, hash_values, host_indices, extra_info):
    data = [
        mem_pool_host.get_data_page(host_indices[i * page_size])
        for i in range(len(hash_values))
    ]
    return self.storage_backend.batch_set(hash_values, data)
Backend 实现差异
MooncakeStore:RDMA 零拷贝
Mooncake 是最典型的高性能 RDMA backend。Python 层的 MooncakeStore 会通过 pybind 调 C++ MooncakeDistributedStore。
def batch_exists(self, keys, extra_info=None):
    keys = self._tag_keys(keys)
    exist_result = self.store.batch_is_exist(keys)
    for i in range(len(keys)):
        if exist_result[i] != 1:
            return i // key_multiplier

def batch_get_v1(self, keys, host_indices, extra_info=None):
    key_strs, buffer_ptrs, buffer_sizes = self._batch_preprocess(
        keys, host_indices
    )
    get_results = self.store.batch_get_into(
        key_strs, buffer_ptrs, buffer_sizes
    )

def batch_set_v1(self, keys, host_indices, extra_info=None):
    key_strs, buffer_ptrs, buffer_sizes = self._batch_preprocess(
        keys, host_indices
    )
    set_results = self.store.batch_put_from(
        key_strs, buffer_ptrs, buffer_sizes
    )
_batch_preprocess() 会把逻辑 page hash 转成真正存储 key 和 buffer 指针:
- MHA 模型:每个 page 拆成 K / V 两个 key,例如
"{hash}_{rank}_k"和"{hash}_{rank}_v"。 - MLA 模型:通常只需要一个 K buffer,因为 MLA 的 V 不按同样方式放在 page 中。
- 最终返回
key_strs、buffer_ptrs、buffer_sizes,C++ RDMA 接口直接用这些指针读写 L2 host memory。
AibrixKVCacheStorage:显式 Global KV Cache Manager
AIBrix 是这里唯一显式使用 BaseKVCacheManager 的 backend。它把 L3 操作抽象成跨节点 KV block 的 exists、acquire、allocate_for、put,底层可以对接 Infinistore 或 PrisKV。
from aibrix_kvcache import BaseKVCacheManager, BlockHashes

class AibrixKVCacheStorage(HiCacheStorage):
    def __init__(self, storage_config, mem_pool):
        config = KVCacheConfig(
            block_spec=KVCacheBlockSpec(
                block_ntokens=page_size,
                block_dtype=kv_cache_dtype,
                block_layout=KVCacheBlockLayout("NCLD"),
                tensor_spec=KVCacheTensorSpec(
                    heads=head_ids,
                    layers=layer_ids,
                    head_size=head_dim,
                ),
            ),
            model_spec=ModelSpec(102400),
        )
        self.kv_cache_manager = BaseKVCacheManager(config)

    def batch_get(self, keys, target_locations):
        block_hash = BlockHashes(keys, self.page_size)
        status = self.kv_cache_manager.acquire(None, block_hash)
        if status.is_ok():
            kv_blocks = status.value.to_tensors()
            for i in range(len(kv_blocks)):
                target_locations[i].copy_(kv_blocks[i].flatten())
            return target_locations

    def batch_set(self, keys, values):
        block_hash = BlockHashes(keys, self.page_size)
        status = self.kv_cache_manager.allocate_for(None, block_hash)
        handle = status.value
        tensors = handle.to_tensors()
        for i in range(len(tensors)):
            tensors[i].copy_(values[i])
        self.kv_cache_manager.put(None, block_hash, handle)

    def batch_exists(self, keys, extra_info=None):
        block_hash = BlockHashes(keys, self.page_size)
        status = self.kv_cache_manager.exists(None, block_hash)
        return status.value // self.page_size
这里的 BaseKVCacheManager 是真正的 global 管理层:它负责跨节点 KV block 的分配、存在性检查、远端读取和提交写入。
HiCacheSiMM:C++ Store RDMA 接口
SiMM 的结构和 Mooncake 类似,底层是 simm.kv.Store,批量 exists / get / set 都交给 C++ store:
self.store.mexists(key_strs)
self.store.mget(key_strs, block_views)
self.store.mput(key_strs, block_views)
block_views 指向 L2 host memory,因此也可以走零拷贝风格的数据路径。
HiCacheHF3FS:3FS + metadata service
HF3FS 使用 3FS 分布式文件系统和 metadata service。metadata 负责 page key 到文件 / page index 的映射,usrbio client 负责批量读写。
results = self.metadata_client.exists(self.rank, keys)
self.usrbio_client.batch_read(keys, buffers)
self.metadata_client.reserve_and_allocate_page_indices(keys)
self.metadata_client.confirm_write(keys)
读路径中,batch_read() 可以把数据写入目标 buffers;写路径通常先 reserve page indices,再并发写入文件,最后 confirm_write() 提交 metadata。
HiCacheFile:本地磁盘实现
File backend 是最直接的本地磁盘实现,适合调试和单机验证:
# exists
os.path.exists(f"{hash}_{modelname}_{tp_rank}_{tp_size}.bin")

# set
tensor.contiguous().numpy().tofile(path)

# get
open(path, "rb").readinto(pre_allocated_buffer)
它没有 RDMA 语义,本质是文件读写和 CPU copy。
Longest-prefix Exists
所有 backend 的 batch_exists() 都要实现最长连续前缀语义:从 keys[0] 开始检查,遇到第一个不存在的 key 就停止,返回已连续存在的 page 数。
这个语义会被 _storage_hit_query() 直接利用:
for i in range(0, len(batch_tokens), page_size):
    last_hash = self.get_hash_str(batch_tokens[i:i + page_size], last_hash)
    batch_hashes.append(last_hash)

hit_page_num = self.storage_backend.batch_exists(batch_hashes, extra_info)
if hit_page_num < len(batch_hashes):
    break
因为 HiCache 的 page hash 是链式 hash:每个 page 的 hash 都依赖前一个 page 的 hash。一旦中间 miss,后续 page 就不再满足连续 prefix 复用语义,也不应该继续查询。这和 L2 backup invariant 保持一致:可复用 KV 必须是从 root 开始的连续 prefix。