Chapter 1 C++ Basic
这里是一些C++相关的基础概念,以及一些C++17/20新特性相关学习笔记
1 Container
1.1 std::vector
- 迭代器在vector插入超过容量后,自动扩容时失效
引用语义在使用 span 时必须谨慎。将一个新元素插入 vector 中,该 vector 中保存了跨度所引用的元素。由于 span 的引用语义,若 vector 分配新的内存,会使所有迭代器和指向其元素的指针无效,所以重新分配也会使引用 vector 元素的 span 失效。span 指向了不再存在的元素。 出于这个原因,需要在插入前后都要仔细检查容量 (分配内存的最大元素数量)。若容量发生变化,则重新初始化 span
2 Algorithm
2.1 std::transform
- std::transform applies the given function to the elements of the given input range(s), and stores the result in an output range starting from d_first.
parameters
first1, last1: the pair of iterators defining the source range of elements to transform ;
first2: the beginning of the second range of elements to transform, (3,4) only;
d_first: the beginning of the destination range, may be equal to first1 or first2;
policy: the execution policy to use;
unary_op: Ret fun(const Type &a);
binary_op: Ret fun(const Type1 &a, const Type2 &b);
possible implementation
template<class InputIt, class OutputIt, class UnaryOp>
constexpr //< since C++20
OutputIt transform(InputIt first1, InputIt last1,
                   OutputIt d_first, UnaryOp unary_op)
{
    for (; first1 != last1; ++d_first, ++first1)
        *d_first = unary_op(*first1);

    return d_first;
}

template<class InputIt1, class InputIt2,
         class OutputIt, class BinaryOp>
constexpr //< since C++20
OutputIt transform(InputIt1 first1, InputIt1 last1, InputIt2 first2,
                   OutputIt d_first, BinaryOp binary_op)
{
    for (; first1 != last1; ++d_first, ++first1, ++first2)
        *d_first = binary_op(*first1, *first2);

    return d_first;
}
example
#include <algorithm>
#include <cctype>
#include <iomanip>
#include <iostream>
#include <string>
#include <utility>
#include <vector>

void print_ordinals(const std::vector<unsigned>& ordinals)
{
    std::cout << "ordinals: ";
    for (unsigned ord : ordinals)
        std::cout << std::setw(3) << ord << ' ';
    std::cout << '\n';
}

char to_uppercase(unsigned char c)
{
    return std::toupper(c);
}

void to_uppercase_inplace(char& c)
{
    c = to_uppercase(c);
}

void unary_transform_example(std::string& hello, std::string world)
{
    // Transform string to uppercase in-place

    std::transform(hello.cbegin(), hello.cend(), hello.begin(), to_uppercase);
    std::cout << "hello = " << std::quoted(hello) << '\n';

    // for_each version (see Notes above)
    std::for_each(world.begin(), world.end(), to_uppercase_inplace);
    std::cout << "world = " << std::quoted(world) << '\n';
}

void binary_transform_example(std::vector<unsigned> ordinals)
{
    // Transform numbers to doubled values

    print_ordinals(ordinals);

    std::transform(ordinals.cbegin(), ordinals.cend(), ordinals.cbegin(),
                   ordinals.begin(), std::plus<>{});

    print_ordinals(ordinals);
}

int main()
{
    std::string hello("hello");
    unary_transform_example(hello, "world");

    std::vector<unsigned> ordinals;
    std::copy(hello.cbegin(), hello.cend(), std::back_inserter(ordinals));
    binary_transform_example(std::move(ordinals));
}
// OUTPUT
// hello = "HELLO"
// world = "WORLD"
// ordinals:  72  69  76  76  79
// ordinals: 144 138 152 152 158
2.2 std::accumulate
Computes the sum of the given value init and the elements in the range [first, last).
parameters
- first, last - the pair of iterators defining the range of elements to accumulate
- init - initial value of the accumulate
- op - Ret fun(const Type1 &a, const Type2 &b);
如标准库中的std::plus<>
possible implementation
accumulate (1)
template<class InputIt, class T>
constexpr // since C++20
T accumulate(InputIt first, InputIt last, T init)
{
    for (; first != last; ++first)
        init = std::move(init) + *first; // std::move since C++20

    return init;
}

template<class InputIt, class T, class BinaryOperation>
constexpr // since C++20
T accumulate(InputIt first, InputIt last, T init, BinaryOperation op)
{
    for (; first != last; ++first)
        init = op(std::move(init), *first); // std::move since C++20

    return init;
}
2.3 std::optinal
-
std::optional最高效的写法是触发RVO的写法,即:
optional<A> optional_best(int n) {
    optional<A> temp(someFn(n));
    return temp;
}
2.4 std::move
- 将
[first, last)范围内的元素移动到以 d_first 开始的目标范围
template <typename InputIt, typename OutputIt>
OutputIt std::move(InputIt first, InputIt last, OutputIt d_first);
- 返回一个迭代器,指向目标范围移动后的结束位置(即 d_first + (last - first))。
| 参数 | 类型 | 描述 |
|---|---|---|
| first | InputIt | 源范围的起始迭代器(指向要移动的第一个元素) |
| last | InputIt | 源范围的结束迭代器(指向最后一个元素的下一个位置) |
| d_first | OutputIt | 目标范围的起始迭代器(指向移动后第一个元素位置) |
2.5 std::move_backward
- 目标位置:元素会被移动到以 d_last 为结束的目标范围,即目标范围是
[d_last - N, d_last),其中 N = last - first。
template <class BidirIt1, class BidirIt2>
BidirIt2 std::move_backward(BidirIt1 first, BidirIt1 last, BidirIt2 d_last);
- 返回一个迭代器,指向目标范围移动后的起始位置(即 d_last - (last - first))
| 参数 | 类型 | 描述 |
|---|---|---|
| first | BidirIt1 | 源范围的起始迭代器(指向要移动的第一个元素) |
| last | BidirIt1 | 源范围的结束迭代器(指向最后一个元素的下一个位置) |
| d_last | BidirIt2 | 目标范围的结束迭代器(指向移动后最后一个元素的下一个位置) |
2.6 std::lower_bound 和 std::upper_bound
- 实际上是二分查找的实现
std::lower_bound: 返回第一个不小于给定值的元素位置。
返回值: 指向第一个满足 *it >= value 的元素的迭代器。若没有这样的元素,则返回 end()
std::upper_bound: 返回第一个大于给定值的元素位置。
返回值: 指向第一个满足 *it > value 的元素的迭代器。若没有这样的元素,则返回 end()。
2.7 std::distance
std::distance 返回从第一个迭代器到第二个迭代器之间的元素数量。对于随机访问迭代器(如 std::vector、std::deque、std::array 的迭代器),它的时间复杂度是 O(1);对于其他类型的迭代器(如 std::list、std::forward_list 的迭代器),时间复杂度是 O(n),因为它需要逐个遍历元素。
template<class InputIterator>
typename std::iterator_traits<InputIterator>::difference_type
    std::distance(InputIterator first, InputIterator last);
2.8 std::all_of, std::any_of, std::none_of
std::all_of: 检查所有元素是否都满足条件(Predicate 返回 true)。
std::any_of: 检查是否至少有一个元素满足条件。
std::non_of: 检查是否全部不满足条件
- 参数说明 |参数| 说明| |---|---| |first| 起始迭代器,指向待检查范围的第一个元素。| |last| 终止迭代器,指向待检查范围的末尾(最后一个元素的下一个位置)。| |p| 谓词(Predicate),接受一个元素类型的参数,返回 bool 类型的条件结果。|
2.9 std::count, std::count_if
-
std::count
统计值为 value 的元素个数template<class InputIt, class T> typename iterator_traits<InputIt>::difference_type count(InputIt first, InputIt last, const T& value); -
std::count_if
统计符合条件的元素个数template<class InputIt, class Predicate> typename iterator_traits<InputIt>::difference_type count_if(InputIt first, InputIt last, Predicate p);
2.10 std::find, std::find_if
-
std::find: 返回第一个等于 value 的迭代器
自定义对象使用std::find,需重载 operator==template<class InputIt, class T> InputIt find(InputIt first, InputIt last, const T& value); -
std::find_if: 在范围内查找第一个满足谓词条件的元素。
template<class InputIt, class Predicate>
InputIt find_if(InputIt first, InputIt last, Predicate p);
2.11 std::copy, std::copy_if
-
std::copy: 完全复制所有元素
template<class InputIt, class OutputIt, class Predicate> OutputIt copy(InputIt first, InputIt last, OutputIt d_first); -
std::copy_if: 选择性复制元素
template<class InputIt, class OutputIt, class Predicate>
OutputIt copy_if(InputIt first, InputIt last, OutputIt d_first, Predicate pred);
2.12 std::fill, std::generate
- std::fill: 用固定值填充范围
template<class ForwardIt, class T> void fill(ForwardIt first, ForwardIt last, const T& value); - std::generate: 用生成器函数填充范围
template<class ForwardIt, class Generator>
void generate(ForwardIt first, ForwardIt last, Generator gen);
可以使用随机数生成器来进行填充
#include <vector>
#include <algorithm>
#include <random>

std::vector<int> v(5);
int counter = 0;
std::generate(v.begin(), v.end(), [&counter]() {
    return counter++; // 生成 0, 1, 2, 3, 4
});

// 生成随机数
std::random_device rd;
std::mt19937 rng(rd());
std::uniform_int_distribution<int> dist(1, 10);
std::generate(v.begin(), v.end(), [&]() { return dist(rng); });
2.13 std::search, std::mismatch
-
std::search: 在序列中搜索子序列。
template<class ForwardIt1, class ForwardIt2> ForwardIt1 search(ForwardIt1 first1, ForwardIt1 last1, ForwardIt2 first2, ForwardIt2 last2); // 示例:在 v1 中查找子序列 v2 std::vector<int> v1 = {1, 2, 3, 4, 5, 6}; std::vector<int> v2 = {3, 4}; auto it = std::search(v1.begin(), v1.end(), v2.begin(), v2.end()); // 返回指向3的迭代器 -
std::mismatch: 在比较两个序列,返回第一个不匹配的位置。
  template<class InputIt1, class InputIt2>
  std::pair<InputIt1, InputIt2> mismatch(InputIt1 first1, InputIt1 last1, InputIt2 first2);

  // 示例:比较两个字符串
  std::string s1 = "hello", s2 = "hxllo";
  auto [it1, it2] = std::mismatch(s1.begin(), s1.end(), s2.begin());
  // it1指向s1的'e', it2指向s2的'x'
2.14 std::replace, std::replace_if
- std::replace: 替换所有等于 old_value 的元素。
template<class ForwardIt, class T>
void replace(ForwardIt first, ForwardIt last, const T& old_value, const T& new_value);

// 示例:替换所有3为5
std::vector<int> v = {1, 2, 3, 3, 4};
std::replace(v.begin(), v.end(), 3, 5); // v变为{1, 2, 5, 5, 4}
- std::replace_if: 替换满足谓词的元素
template<class ForwardIt, class Predicate, class T>
void replace_if(ForwardIt first, ForwardIt last, Predicate pred, const T& new_value);

// 示例:替换所有偶数为0
std::replace_if(v.begin(), v.end(), [](int x) { return x % 2 == 0; }, 0);
2.15 std::remove / std::remove_if
移动满足条件的元素到末尾,返回新逻辑结尾。
template<class ForwardIt, class T>
ForwardIt remove(ForwardIt first, ForwardIt last, const T& value);

template<class ForwardIt, class Predicate>
ForwardIt remove_if(ForwardIt first, ForwardIt last, Predicate pred);

// 示例:删除所有3(需结合erase)
std::vector<int> v = {1, 2, 3, 4, 3};
auto new_end = std::remove(v.begin(), v.end(), 3);
v.erase(new_end, v.end()); // v变为{1, 2, 4}
2.16 std::reverse
- 反转整个序列
template<class BidirIt>
void reverse(BidirIt first, BidirIt last);

// 示例:反转vector
std::reverse(v.begin(), v.end()); // {1, 2, 3} → {3, 2, 1}
2.17 std::rotate
- 把middle旋转到开头
template<class ForwardIt>
ForwardIt rotate(ForwardIt first, ForwardIt middle, ForwardIt last);

// 示例:将中间元素旋转到开头
std::vector<int> v = {1, 2, 3, 4, 5};
std::rotate(v.begin(), v.begin() + 2, v.end()); // v变为{3, 4, 5, 1, 2}
2.18 std::shuffle
- 使用一个随机生成器,打乱序列
template<class RandomIt, class RandomGen>
void shuffle(RandomIt first, RandomIt last, RandomGen&& g);

// 示例:使用随机引擎
#include <random>
std::vector<int> v = {1, 2, 3, 4};
std::random_device rd;
std::mt19937 rng(rd());
std::shuffle(v.begin(), v.end(), rng); // 随机排列
2.19 std::unique
删除相邻重复元素(需先排序)。
template<class ForwardIt>
ForwardIt unique(ForwardIt first, ForwardIt last);

// 示例:删除相邻重复项
std::vector<int> v = {1, 1, 2, 3, 3};
auto last = std::unique(v.begin(), v.end());
v.erase(last, v.end()); // v变为{1, 2, 3}
2.20 std::sort, std::stable_sort, std::partial_sort
- std::partial_sort是部分排序
template<class RandomIt>
void sort(RandomIt first, RandomIt last);

template<class RandomIt>
void stable_sort(RandomIt first, RandomIt last);

// 示例:降序排序
std::sort(v.begin(), v.end(), [](int a, int b) { return a > b; });

template<class RandomIt>
void partial_sort(RandomIt first, RandomIt middle, RandomIt last);

// 示例:找到前3小的元素
std::vector<int> v = {5, 3, 1, 4, 2};
std::partial_sort(v.begin(), v.begin() + 3, v.end()); // 前3个元素为{1, 2, 3}
2.21 std::nth_element
- 将第n个元素排序到正确的位置上
template<class RandomIt>
void nth_element(RandomIt first, RandomIt nth, RandomIt last);

// 示例:找到第3小的元素
std::nth_element(v.begin(), v.begin() + 2, v.end());
// v = 3,其他元素相对无序
2.22 std::merge
- 合并两个有序序列
template<class InputIt1, class InputIt2, class OutputIt>
OutputIt merge(InputIt1 first1, InputIt1 last1, InputIt2 first2, InputIt2 last2, OutputIt d_first);

// 示例:合并两个有序vector
std::vector<int> v1 = {1, 3, 5}, v2 = {2, 4, 6}, result;
std::merge(v1.begin(), v1.end(), v2.begin(), v2.end(), std::back_inserter(result));
// result = {1, 2, 3, 4, 5, 6}
2.23 std::partition, std::stable_partition, std::partition_point
- std::partition: 将满足条件的元素移动到前端
template<class ForwardIt, class Predicate>
ForwardIt partition(ForwardIt first, ForwardIt last, Predicate pred);

// 示例:按奇偶分区
std::vector<int> v = {1, 2, 3, 4, 5};
auto it = std::partition(v.begin(), v.end(), [](int x) { return x % 2 != 0; });
// 奇数在前,偶数在后(可能改变相对顺序)
- std::partition_point: 返回分区点
template<class ForwardIt, class Predicate>
ForwardIt partition_point(ForwardIt first, ForwardIt last, Predicate pred);

// 示例:找到分区点
auto it = std::partition_point(v.begin(), v.end(), [](int x) { return x % 2 != 0; });
2.24 std::minelement, std::maxelement, std::clamp
template<class ForwardIt>
ForwardIt min_element(ForwardIt first, ForwardIt last);

// 示例:找到最大值
auto it = std::max_element(v.begin(), v.end());
- std::clamp: 将元素限制在范围内
template<class T>
const T& clamp(const T& value, const T& lo, const T& hi);

// 示例:限制数值在[0, 100]
int x = 150;
x = std::clamp(x, 0, 100); // x变为100
2.25 std::sample
- 随机采样,需要插入迭代器
template<class PopulationIt, class SampleIt, class Distance, class UniformRandomBitGenerator>
SampleIt sample(PopulationIt first, PopulationIt last, SampleIt out, Distance n, UniformRandomBitGenerator&& g);

// 示例:随机采样3个元素
std::vector<int> src = {1, 2, 3, 4, 5}, dest;
std::sample(src.begin(), src.end(), std::back_inserter(dest), 3, std::mt19937{});
3 Iterator
- 输入迭代器:只能用来读取指向的值;当该迭代器自加时,之前指向的值就不可访问。
std::istream_iterator 就是这样的迭代器。 - 前向迭代器:类似于输入迭代器,可以在指示范围迭代多次
std::forward_list 就是这样的迭代器。就像一个单向链表一样,只能向前遍历,不能向后遍历,但可以反复迭代。 - 双向迭代器:这个迭代器可以自增,也可以自减,迭代器可以向前或向后迭代。
std::list, std::set 和 std::map 都支持双向迭代器。 - 随机访问迭代器:与其他迭代器不同,随机访问迭代器一次可以跳转到任何容器中的元素上,而非之前的迭代器,一次只能移动一格。
std::vector 和 std::deque 的迭代器就是这种类型。 - 连续迭代器:这种迭代器具有前述几种迭代器的所有特性,不过需要容器内容在内存上是连续的,类似一个数组或 std::vector 。
- 输出迭代器:该迭代器与其他迭代器不同。因为这是一个单纯用于写出的迭代器,其只能增加,并且将对应内容写入文件当中。如果要读取这个迭代中的数据,那么读取到的值就是未定义的
- 可变迭代器:如果一个迭代器既有输出迭代器的特性,又有其他迭代器的特性,那么这个迭代器就是可变迭代器。
该迭代器可读可写。如果我们从一个非常量容器的实例中获取一个迭代器,那么这个迭代器通常都是可变迭代器。
3.1 std::back_insert_iterator
-
内部调用容器的
push_back方法// 使用 back_insert_iterator 在 destination 的末尾插入元素 std::copy(source.begin(), source.end(), std::back_inserter(destination));
3.2 std::front_insert_iterator
-
内部调用容器的
push_front方法// 使用 front_insert_iterator 在 destination 的开头插入元素 std::copy(source.begin(), source.end(), std::front_inserter(destination));
3.3 std::insert_iterator
-
std::insert_iterator 是一个通用的插入迭代器,可以在容器的任意位置插入元素。它需要一个容器和一个插入位置。
// 在 destination 的第二个位置插入 source 的元素
std::copy(source.begin(), source.end(), std::inserter(destination, destination.begin() + 1));
3.4 std::istream_iterator
- std::istream_iterator 是一个输入流迭代器,用于从输入流(如 std::cin)读取数据
#include <iostream>
#include <vector>
#include <iterator>
#include <algorithm> // std::copy

int main() {
    std::vector<int> numbers;

    std::cout << "Enter some integers (end with EOF):" << std::endl;

    // 使用 istream_iterator 从 std::cin 读取整数
    std::copy(std::istream_iterator<int>(std::cin), std::istream_iterator<int>(), std::back_inserter(numbers));

    std::cout << "You entered:" << std::endl;
    for (int num : numbers) {
        std::cout << num << " ";
    }
    // 输出用户输入的整数
    return 0;
}
3.5 std::ostream_iterator
- std::ostream_iterator 是一个输出流迭代器,用于将数据写入输出流(如 std::cout)
#include <iostream>
#include <vector>
#include <iterator>
#include <algorithm> // std::copy

int main() {
    std::vector<int> numbers = {1, 2, 3, 4, 5};

    // 使用 ostream_iterator 将 numbers 写入 std::cout,每个元素后加空格
    std::copy(numbers.begin(), numbers.end(), std::ostream_iterator<int>(std::cout, " "));

    // 输出: 1 2 3 4 5
    return 0;
}
4 FileSystem
-
文件系统库提供对文件系统及其组件(例如路径、常规文件和目录)执行操作的工具。
文件系统库最初开发为boost.filesystem ,并作为技术规范 ISO/IEC TS 18822:2015发布,最终于 C++17 合并到 ISO C++ 中。目前,boost 实现在比 C++17 库更多的编译器和平台上可用。 -
如果对此库中的函数的调用引发文件系统竞争,即当多个线程、进程或计算机交错访问和修改文件系统中的同一对象时,则行为未定义。
4.1 定义
- file:保存数据的文件系统对象,可以写入、读取或两者兼而有之。文件具有名称、属性,其中之一是文件类型:
- 目录:充当目录条目容器的文件,用于标识其他文件(其中一些可能是其他嵌套目录)。在讨论特定文件时,该文件作为条目出现的目录是其父目录。父目录可以用相对路径名表示“……”。
- 常规文件:将名称与现有文件关联的目录条目(即硬链接)。如果支持多个硬链接,则在删除指向该文件的最后一个硬链接后,该文件将被删除。
- 符号链接:将名称与路径相关联的目录条目,该路径可能存在也可能不存在。
- 其他特殊文件类型:块、字符、fifo、套接字。
- 文件名:用于命名文件的字符串。允许的字符、区分大小写、最大长度和不允许的名称由实现定义。名称“.”和“..”在库层面具有特殊含义。
- 路径:标识文件的元素序列。它以可选的根名称开头(例如“C:”或者“//server”在 Windows 上),然后是可选的根目录(例如“/”在 Unix 上),后跟零个或多个文件名序列(除最后一个文件名外,其他文件名都必须是目录或目录链接)。路径 (pathname )的字符串表示的本机格式(例如,使用哪些字符作为分隔符)和字符编码是实现定义的,此库提供可移植的路径表示。
- 绝对路径:明确标识文件位置的路径。
- 规范路径:不包含符号链接的绝对路径,“.”或者“..”元素。
- 相对路径:用于标识文件相对于文件系统上某个位置的位置的路径。特殊路径名“.”(点,“当前目录”)和“..”(点点,“父目录”)是相对路径。
4.2 directory
#include <algorithm>
#include <filesystem>
#include <fstream>
#include <iostream>

int main()
{
    const std::filesystem::path sandbox{"sandbox"};
    std::filesystem::create_directories(sandbox/"dir1"/"dir2");
    std::ofstream{sandbox/"file1.txt"};
    std::ofstream{sandbox/"file2.txt"};

    std::cout << "directory_iterator:\n";
    // directory_iterator can be iterated using a range-for loop
    for (auto const& dir_entry : std::filesystem::directory_iterator{sandbox})
        std::cout << dir_entry.path() << '\n';

    std::cout << "\ndirectory_iterator as a range:\n";
    // directory_iterator behaves as a range in other ways, too
    std::ranges::for_each(
        std::filesystem::directory_iterator{sandbox},
        [](const auto& dir_entry) { std::cout << dir_entry << '\n'; });

    std::cout << "\nrecursive_directory_iterator:\n";
    for (auto const& dir_entry : std::filesystem::recursive_directory_iterator{sandbox})
        std::cout << dir_entry << '\n';

    // delete the sandbox dir and all contents within it, including subdirs
    std::filesystem::remove_all(sandbox);
}
// Possible output:
// directory_iterator:
// "sandbox/file2.txt"
// "sandbox/file1.txt"
// "sandbox/dir1"

// directory_iterator as a range:
// "sandbox/file2.txt"
// "sandbox/file1.txt"
// "sandbox/dir1"

// recursive_directory_iterator:
// "sandbox/file2.txt"
// "sandbox/file1.txt"
// "sandbox/dir1"
// "sandbox/dir1/dir2"
4.3 space_info
-
确定路径名所在的文件系统的信息页位于,如同通过 POSIX 的 statvfs 操作一样。
-
该对象由 POSIX struct statvfs 内容进行填充如下所示:
- space_info.capacity设置为f_blocks * f_frsize。
- space_info.free设置为f_bfree * f_frsize。
- space_info.available设置为f_bavail * f_frsize。
- 任何无法确定的成员都设置为static_caststd::uintmax_t(-1)
#include <cstdint>
#include <filesystem>
#include <iostream>
#include <locale>

std::uintmax_t disk_usage_percent(const std::filesystem::space_info& si,
                                  bool is_privileged = false) noexcept
{
    if (constexpr std::uintmax_t X(-1);
        si.capacity == 0 || si.free == 0 || si.available == 0 ||
        si.capacity == X || si.free == X || si.available == X
    )
        return 100;

    std::uintmax_t unused_space = si.free, capacity = si.capacity;
    if (!is_privileged)
    {
        const std::uintmax_t privileged_only_space = si.free - si.available;
        unused_space -= privileged_only_space;
        capacity -= privileged_only_space;
    }
    const std::uintmax_t used_space{capacity - unused_space};
    return 100 * used_space / capacity;
}

void print_disk_space_info(auto const& dirs, int width = 14)
{
    (std::cout << std::left).imbue(std::locale("en_US.UTF-8"));

    for (const auto s : {"Capacity", "Free", "Available", "Use%", "Dir"})
        std::cout << "│ " << std::setw(width) << s << ' ';

    for (std::cout << '\n'; auto const& dir : dirs)
    {
        std::error_code ec;
        const std::filesystem::space_info si = std::filesystem::space(dir, ec);
        for (auto x : {si.capacity, si.free, si.available, disk_usage_percent(si)})
            std::cout << "│ " << std::setw(width) << static_cast<std::intmax_t>(x) << ' ';
        std::cout << "│ " << dir << '\n';
    }
}

int main()
{
    const auto dirs = {"/dev/null", "/tmp", "/home", "/proc", "/null"};
    print_disk_space_info(dirs);
}
// Possible output:

// │ Capacity       │ Free           │ Available      │ Use%           │ Dir
// │ 84,417,331,200 │ 42,732,986,368 │ 40,156,028,928 │ 50             │ /dev/null
// │ 84,417,331,200 │ 42,732,986,368 │ 40,156,028,928 │ 50             │ /tmp
// │ -1             │ -1             │ -1             │ 100            │ /home
// │ 0              │ 0              │ 0              │ 100            │ /proc
// │ -1             │ -1             │ -1             │ 100            │ /null
4.4 symlink
- 软链接也叫符号链接,会创建一个新的inode块,里面的数据内容是链接的文件名称
- 创建一个软链接
#include <cassert>
#include <filesystem>
#include <iostream>
namespace fs = std::filesystem;

int main()
{
    fs::create_directories("sandbox/subdir");
    fs::create_symlink("target", "sandbox/sym1");
    fs::create_directory_symlink("subdir", "sandbox/sym2");

    for (auto it = fs::directory_iterator("sandbox"); it != fs::directory_iterator(); ++it)
        if (is_symlink(it->symlink_status()))
            std::cout << *it << "->" << read_symlink(*it) << '\n';

    assert(std::filesystem::equivalent("sandbox/sym2", "sandbox/subdir"));
    fs::remove_all("sandbox");
}

// Possible output:

// "sandbox/sym1"->"target"
// "sandbox/sym2"->"subdir"
读取软链接文件,会获取到被链接的文件本身
#include <filesystem>
#include <iostream>

namespace fs = std::filesystem;

int main()
{
    for (fs::path p : {"/usr/bin/gcc", "/bin/cat", "/bin/mouse"})
    {
        std::cout << p;
        fs::exists(p) ?
            fs::is_symlink(p) ?
                std::cout << " -> " << fs::read_symlink(p) << '\n' :
                std::cout << " exists but it is not a symlink\n" :
            std::cout << " does not exist\n";
    }
}

// Possible output:

// "/usr/bin/gcc" -> "gcc-5"
// "/bin/cat" exists but it is not a symlink
// "/bin/mouse" does not exist
4.5 status
就像POSIX中 stat 获取文件方式类似
#include <cstdio>
#include <cstring>
#include <filesystem>
#include <fstream>
#include <iostream>
#include <sys/socket.h>
#include <sys/stat.h>
#include <sys/un.h>
#include <unistd.h>

namespace fs = std::filesystem;

void demo_status(const fs::path& p, fs::file_status s)
{
    std::cout << p;
    // alternative: switch(s.type()) { case fs::file_type::regular: ...}
    if (fs::is_regular_file(s))
        std::cout << " is a regular file\n";
    if (fs::is_directory(s))
        std::cout << " is a directory\n";
    if (fs::is_block_file(s))
        std::cout << " is a block device\n";
    if (fs::is_character_file(s))
        std::cout << " is a character device\n";
    if (fs::is_fifo(s))
        std::cout << " is a named IPC pipe\n";
    if (fs::is_socket(s))
        std::cout << " is a named IPC socket\n";
    if (fs::is_symlink(s))
        std::cout << " is a symlink\n";
    if (!fs::exists(s))
        std::cout << " does not exist\n";
}

int main()
{
    // create files of different kinds
    fs::create_directory("sandbox");
    fs::create_directory("sandbox/dir");
    std::ofstream{"sandbox/file"}; // create regular file
    fs::create_symlink("file", "sandbox/symlink");

    mkfifo("sandbox/pipe", 0644);
    sockaddr_un addr;
    addr.sun_family = AF_UNIX;
    std::strcpy(addr.sun_path, "sandbox/sock");
    int fd = socket(PF_UNIX, SOCK_STREAM, 0);
    bind(fd, reinterpret_cast<sockaddr*>(&addr), sizeof addr);

    // demo different status accessors
    for (auto it{fs::directory_iterator("sandbox")}; it != fs::directory_iterator(); ++it)
        demo_status(*it, it->symlink_status()); // use cached status from directory entry
    demo_status("/dev/null", fs::status("/dev/null")); // direct calls to status
    demo_status("/dev/sda", fs::status("/dev/sda"));
    demo_status("sandbox/no", fs::status("/sandbox/no"));

    // cleanup (prefer std::unique_ptr-based custom deleters)
    close(fd);
    fs::remove_all("sandbox");
}
// Possible output:

// "sandbox/file" is a regular file
// "sandbox/dir" is a directory
// "sandbox/pipe" is a named IPC pipe
// "sandbox/sock" is a named IPC socket
// "sandbox/symlink" is a symlink
// "/dev/null" is a character device
// "/dev/sda" is a block device
// "sandbox/no" does not exist
4.6 hard link
-
在POSIX系统中,每个目录至少有两个硬链接,自己以及"."
-
".."有三个硬链接,目录本身,"."以及".."
-
多个文件名同时指向同一个索引节点(Inode),只增加i_nlink硬链接计数。
只要文件的索引节点还存在一个以上的链接,删除其中一个链接并不影响索引节点本身和其他的链接(也就是说该文件的实体并未删除),而只有当最后一个链接被删除后,且此时有新数据要存储到磁盘上,那么被删除的文件的数据块及目录的链接才会被释放,存储空间才会被新数据所覆盖。因此,该机制可以有效的防止误删操作。 -
:skull: 硬链接只能在同一类型的文件系统中进行链接,不能跨文件系统。同时它只能对文件进行链接,不能链接目录。
#include <filesystem>
#include <iostream>
namespace fs = std::filesystem;

int main()
{
    // On a POSIX-style filesystem, each directory has at least 2 hard links:
    // itself and the special member pathname "."
    fs::path p = fs::current_path();
    std::cout << "Number of hard links for current path is "
              << fs::hard_link_count(p) << '\n';

    // Each ".." is a hard link to the parent directory, so the total number
    // of hard links for any directory is 2 plus number of direct subdirectories
    p = fs::current_path() / ".."; // Each dot-dot is a hard link to parent
    std::cout << "Number of hard links for .. is "
              << fs::hard_link_count(p) << '\n';
}
// Possible output:

// Number of hard links for current path is 2
// Number of hard links for .. is 3
5 View
通常若引用范围的元素修改,则视图的元素也会修改。
若视图的元素修改,则引用范围的元素也会修改。
视图通常用于在特定的基础上,处理基础范围的元素子集和/或经过一些可选转换后的值。例 如,可以使用一个视图来迭代一个范围的前五个元素
for (const auto& elem : std::views::take(coll, 5)) { ... }
-
管道语法中让视图对范围进行操作。通过使用操作符 |,可以创建视图的管道:
auto v = coll | std::views::filter([](auto elem){return elem % 3 == 0;}) | std::views::transform([](auto elem){return elem * elem;}) |std::views::take(3); -
通过类模板指定范围结束的值
template<auto End> struct EndValue { bool operator== (auto pos) const { return *pos == End; // end is where iterator points to End } }; int main() { std::vector coll = {42, 8, 0, 15, 7, -1}; std::ranges::subrange range{coll.begin(), EndValue<7>{}}; std::ranges::sort(range); std::ranges::for_each(coll.begin(), EndValue<-1>{}, [](auto value){std::cout << ' ' << value;}) } -
支持投影功能,避免写显示的比较器,直接通过投影的方式指定使用Person的age进行排序
struct Person {
  std::string name;
  int age;
};
std::vector<Person> people = {{"Alice", 25}, {"Bob", 30}, {"Charlie", 20}};
std::sort(people.begin(), people.end(),
          [](const Person& a, const Person& b) { return a.age < b.age; });
std::ranges::sort(people, std::less<int>{}, &Person::age);
6 Span
:skull: 这段代码会导致未定义的行为,因为基于范围的 for 循环中存在一个 bug,在对临时对象的引用上进行迭代时会使用已经销毁的值
// for the last 3 returned elements:
for (auto s : std::span{arrayOfConst()}.last(3))
// fatal runtime ERROR
Chapter 2 Concurrency Programming
这里是一些C++无锁编程相关学习笔记
2.1 thread & jthread
thread 传递参数
- 如果thread执行的函数参数是一个引用的话,需要
std::refvoid update_data_for_widget(widget_id w,widget_data& data); // 1 void oops_again(widget_id w) { widget_data data; std::thread t(update_data_for_widget,w,std::ref(data)); // 2 display_status(); t.join(); process_widget_data(data); } - 这依赖于 std::thread 实例的可移动且不可复 制性。不可复制性表示在某一时间点,一个 std::thread 实例只能关联一个执行线程。可移动性使得开发者可 以自己决定,哪个实例拥有线程实际执行的所有权
std::thread::hardware_concurrency()会返回并发线程的数量。例如,多核系统中, 返回值可以是CPU核芯的数量。返回值也仅仅是一个标识,当无法获取时,函数返回0。// parallel accumulate template<typename Iterator,typename T> struct accumulate_block { void operator()(Iterator first,Iterator last,T& result) { result=std::accumulate(first,last,result); } }; template<typename Iterator,typename T> T parallel_accumulate(Iterator first,Iterator last,T init) { unsigned long const length=std::distance(first,last); if(!length) // 1 return init; unsigned long const min_per_thread=25; unsigned long const max_threads= (length+min_per_thread-1)/min_per_thread; // 2 unsigned long const hardware_threads= std::thread::hardware_concurrency(); unsigned long const num_threads= // 3 std::min(hardware_threads != 0 ? hardware_threads : 2, max_threads); unsigned long const block_size=length/num_threads; // 4 std::vector<T> results(num_threads); std::vector<std::thread> threads(num_threads-1); // 5 Iterator block_start=first; for(unsigned long i=0; i < (num_threads-1); ++i) { Iterator block_end=block_start; std::advance(block_end,block_size); // 6 threads[i]=std::thread( // 7 accumulate_block<Iterator,T>(), block_start,block_end,std::ref(results[i])); block_start=block_end; // 8 } accumulate_block<Iterator,T>()( block_start,last,results[num_threads-1]); // 9 for (auto& entry : threads) entry.join(); // 10 return std::accumulate(results.begin(),results.end(),init); // 11 }
jthread
- C++11 引入了 std::thread 类型,其与操作系统提供的线程对应,但该类型有一个严重的设计缺 陷: 不是 RAII 类型。
thread 存在的问题
std::thread 要求在其生命周期结束时,若表示正在运行的线程,则调用 join()(等待线程结束) 或 detach()(让线程在后台运行)。若两者都没有调用,析构函数会立即导致异常的程序终止 (在某些系统上导致段错误)。
如果通过确保在离开作用域时调用 join() 来对异常作出反应,而不解决异常。不幸的是,这可能会导致阻塞 (永远)。然而,调用 detach() 也是一个问题,因为线程在程序的后台继续运行,使用 CPU 时间和资源,而这些时间和资源现在可能会销毁。若在更复杂的上下文中使用多个线程,问题会变得更糟,并且会产生非常糟糕的代码。
void foo(){
  std::thread t1{task1, name, val};
  std::thread t2;
  try {
    t2 = std::thread{task2, name, val};
    ...
  }
  catch(...){
    t1.join();
    if(t2.joinable()) {
      t2.join();
    }
    throw;
  }

  t1.join();
  t2.join();
}
std::jthread
- std::jthread 解决了这些问题,它是 RAII 类型。若线程是可汇入的 (“j”代表“汇入”),析构函数会自动调用 join()。
- 内置停止机制:std::jthread 与 std::stop_token 集成,支持直接请求停止线程
void foo(){
  std::jthread t1{task1, name, val};
  std::jthread t2{task2, name, val};
  ...

  t1.join();
  t2.join();
}
jthread的停止令牌和停止回调
- 自动管理停止令牌:当使用 std::jthread 时,不需要手动创建 std::stop_source。std::jthread 自动包含一个内部的 std::stop_source,并在启动线程时将相关的 std::stop_token 传递给线程函数。
- 接收停止令牌:线程函数可以直接接受一个 std::stop_token 参数,该令牌由 std::jthread 提供,确保与线程的内部停止机制同步。
- 定期检查停止请求:在线程函数中,应定期调用 std::stop_token::stop_requested() 来检查是否接收到停止请求。这为安全且及时地停止执行提供了机制。
- 响应停止请求:一旦 std::stop_token 表明停止已被请求,线程函数应采取必要的步骤来安全地终止,这可能包括资源的清理和状态的保存。
#include <iostream>
#include <chrono>
#include <thread>

// 使用 std::jthread 运行的函数
void task(std::stop_token stoken) {
    while (!stoken.stop_requested()) {
        std::cout << "任务正在运行..." << std::endl;
        // 模拟一些工作
        std::this_thread::sleep_for(std::chrono::seconds(1));
    }
    std::cout << "任务已收到停止请求,现在停止运行。" << std::endl;
}

int main() {
    // 创建 std::jthread,自动处理停止令牌
    std::jthread worker(task);

    // 模拟主线程运行一段时间后需要停止子线程
    std::this_thread::sleep_for(std::chrono::seconds(5));
    std::cout << "主线程请求停止子线程..." << std::endl;

    // 触发停止请求
    worker.request_stop();

    // std::jthread 在析构时自动加入
    return 0;
}
std::stop_token 和 std::stop_callback的其他使用案例;
另外, std::stop_token 和 std::stop_callback 并不局限于与线程(如 std::jthread)的使用,它们独立于线程的,用于程序中的任何地方,以提供一种灵活的停止信号处理机制。
#include <iostream>
#include <chrono>
#include <stop_token>

int main() {
    std::stop_source source;
    std::stop_token token = source.get_token();

    // 模拟一些可以被取消的工作
    auto startTime = std::chrono::steady_clock::now();
    auto endTime = startTime + std::chrono::seconds(10);  // 设定10秒后结束任务

    while (std::chrono::steady_clock::now() < endTime) {
        if (token.stop_requested()) {
            std::cout << "Task was canceled!" << std::endl;
            break;
        }
        std::cout << "Working..." << std::endl;
        std::this_thread::sleep_for(std::chrono::seconds(1));

        // 模拟在某个条件下请求停止
        if (std::chrono::steady_clock::now() > startTime + std::chrono::seconds(5)) {
            source.request_stop();
        }
    }

    if (!token.stop_requested()) {
        std::cout << "Task completed normally." << std::endl;
    }

    return 0;
}
- stop_token与std::thread结合
#include <iostream>
#include <thread>
#include <stop_token>
#include <chrono>

void threadFunction(std::stop_token stoken) {
    std::stop_callback callback(stoken, []() {
        std::cout << "Stop request received.\n";
    });
   // 4. 定期检查停止请求
    while (!stoken.stop_requested()) {
        std::cout << "Running...\n";
        std::this_thread::sleep_for(std::chrono::seconds(1));
    }
   // 5. 响应取消请求
    std::cout << "Thread finishing.\n";
}

int main() {
     // 1. 创建并发起取消请求的源
    std::stop_source stopSource;
     // 2. 生成停止令牌
    std::stop_token stoken = stopSource.get_token();
    // 3. 传递停止令牌
    std::thread t(threadFunction, stoken);

    std::this_thread::sleep_for(std::chrono::seconds(5));
     // 触发停止请求
    stopSource.request_stop();

    t.join();
    std::cout << "Thread stopped.\n";
    return 0;
}
2.2 内存模型
volatile访问不会建立线程间的同步。- 此外,
volatile访问不是原子的(并发读写是一个数据竞争问题),并且不会对内存进行排序(非volatile的内存访问可以自由地在volatile访问周围重新排序)。
2.2.1 协议级别
- 原子操作的顺序一致语义被称为强内存模型,原子操作的自由语义被称为弱内存模型。
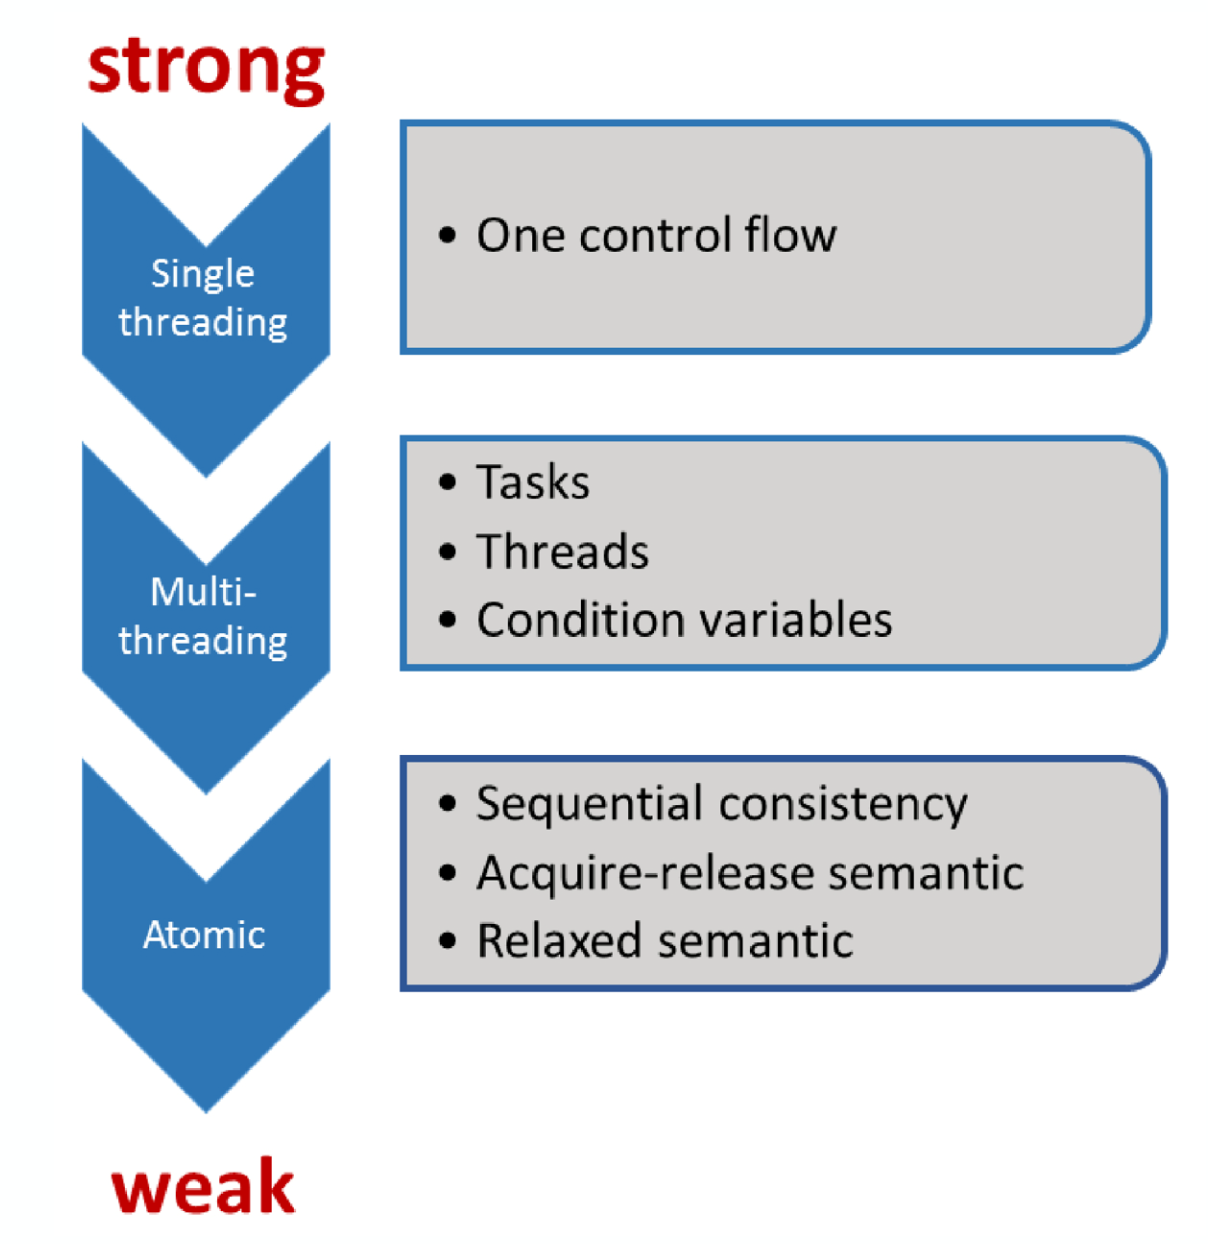
2.2.2 C++的内存序
原子操作默认的内存序是std::memory_order_seq_cst,顺序一致性
enum memory_order{
  memory_order_relaxed,
  memory_order_consume,
  memory_order_acquire,
  memory_order_release,
  memory_order_acq_rel,
  memory_order_seq_cst
}
-
顺序一致:
memory_order_seq_cst -
获取-释放(Acquire-release):
memory_order_consume,memory_order_acquire,memory_order_release和memory_order_acq_rel -
自由序(Relaxed):
memory_order_relaxed
Sequentially-consistent ordering
顺序一致中,一个线程可以看到另一个线程的操作,因此也可以看到所有其他线程的操作。如果使用原子操作的获取-释放语义,那么顺序一致就不成立了。
- 标记为memory_order_seq_cst的原子操作不仅像释放/获取顺序那样对内存进行排序(一个线程中在存储操作之前发生的所有事情都成为另一个线程中加载操作的可见副作用),而且建立了一个所有这样标记的原子操作的单一总修改顺序。
Release-Acquire ordering
- 如果线程A中的原子存储操作标记为
memory_order_release,而线程B中对同一变量的原子加载操作标记为memory_order_acquire,并且线程B中的加载操作读取了线程A中存储操作写入的值,那么线程A中的存储操作与线程B中的加载操作之间就建立了同步关系(synchronizes-with)。 所有在原子存储操作之前发生(从线程A的角度看)的内存写入操作(包括非原子操作和标记为memory_order_relaxed的原子操作)都将成为线程B中可见的副作用。也就是说,一旦原子加载操作完成,线程B将能够看到线程A写入的所有内容。这种保证仅在B实际返回线程A存储的值,或者返回释放序列中更晚的值时才成立。 - 这种同步仅在释放和获取同一原子变量的线程之间建立。其他线程可能会看到与同步线程之一或两者都不同的内存访问顺序。。
互斥锁(如std::mutex或原子自旋锁)是释放-获取同步的一个例子:当线程A释放锁,线程B获取锁时,线程A在释放锁之前在临界区中发生的所有操作都必须对线程B可见(线程B在获取锁之后执行相同的临界区)。 同样的原理也适用于线程的启动和汇入。这两种操作都是获取-释放操作。接下来是wait和notify_one对条件变量的调用;wait是获取操作,notify_one是释放操作。那notify_all呢?当然,也是一个释放操作。
- 在一个释放序列中,即使RMW操作使用了memory_order_relaxed,它也不会破坏释放序列的同步效果。
#include <atomic>
#include <cassert>
#include <thread>
#include <vector>

std::vector<int> data;
std::atomic<int> flag = {0};

void thread_1()
{
    data.push_back(42);
    flag.store(1, std::memory_order_release);
}

void thread_2()
{
    int expected = 1;
    // memory_order_relaxed is okay because this is an RMW,
    // and RMWs (with any ordering) following a release form a release sequence
    while (!flag.compare_exchange_strong(expected, 2, std::memory_order_relaxed))
    {
        expected = 1;
    }
}

void thread_3()
{
    while (flag.load(std::memory_order_acquire) < 2)
        ;
    // if we read the value 2 from the atomic flag, we see 42 in the vector
    assert(data.at(0) == 42); // will never fire
}

int main()
{
    std::thread a(thread_1);
    std::thread b(thread_2);
    std::thread c(thread_3);
    a.join(); b.join(); c.join();
}
- 错误案例
dataProduced.store(true, std::memory_order_release)与dataProduced.load(std::memory_order_acquire)同步。不过,并不意味着获取操作要对释操作进行等待,而这正是下图中的内容。图中,dataProduced.load(std::memory_order_acquire)在指令dataProduced.store(true, std::memory_order_release)之前,所以这里没有同步关系。
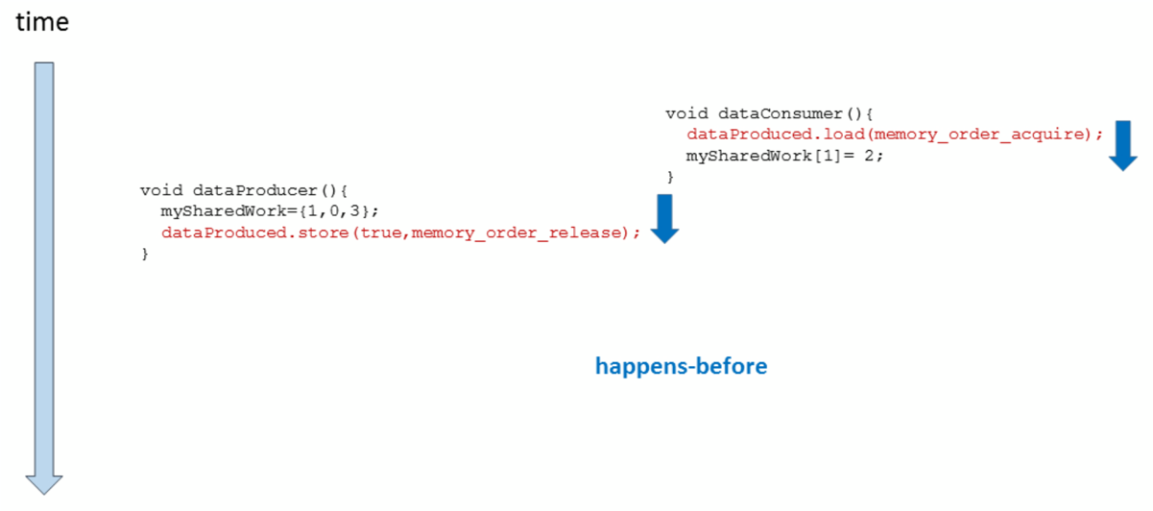
// acquireReleaseWithoutWaiting.cpp

#include <atomic>
#include <iostream>
#include <thread>
#include <vector>

std::vector<int> mySharedWork;
std::atomic<bool> dataProduced(false);

void dataProducer(){
  mySharedWork = {1,0,3};
  dataProduced.store(true, std::memory_order_release);
}

void dataConsumer(){
     dataProduced.load(std::memory_order_acquire);
  myShraedWork[1] = 2;
}

int main(){

  std::cout << std::endl;

  std::thread t1(dataConsumer);
  std::thread t2(dataProducer);

  t1.join();
  t2.join();

  for (auto v : mySharedWork){
    std::cout << v << " ";
  }

  std::cout << "\n\n";

}
- 当dataProduced.store(true, std::memory_order_release)先行于dataProduced.load(std::memory_order_acquire),那么dataProduced.store(true, std::memory_order_release)之前和dataProduced.load(std::memory_order_acquire)之后执行的操作是所有线程可见的。
Relax Ordering
Typical use for relaxed memory ordering is incrementing counters, such as the reference counters of std::shared_ptr, since this only requires atomicity, but not ordering or synchronization (note that decrementing the std::shared_ptr counters requires acquire-release synchronization with the destructor).
#include <atomic>
#include <iostream>
#include <thread>
#include <vector>

std::atomic<int> cnt = {0};

void f()
{
    for (int n = 0; n < 1000; ++n)
        cnt.fetch_add(1, std::memory_order_relaxed);
}

int main()
{
    std::vector<std::thread> v;
    for (int n = 0; n < 10; ++n)
        v.emplace_back(f);
    for (auto& t : v)
        t.join();
    std::cout << "Final counter value is " << cnt << '\n';
}
// always 10000
Chapter 3 Linux Tools
一些linux下经常使用的工具
3.1 grep
- 全面搜索正则表达式并把行打印出来)是一种强大的文本搜索工具,它能使用正则表达式搜索文本,并把匹配的行打印出来。用于过滤/搜索的特定字符。
3.1.1 基本命令选项
-a --text  # 不要忽略二进制数据。
-A <显示行数>   --after-context=<显示行数>   # 除了显示符合范本样式的那一行之外,并显示该行之后的内容。
-b --byte-offset                           # 在显示符合范本样式的那一行之外,并显示该行之前的内容。
-B<显示行数>   --before-context=<显示行数>   # 除了显示符合样式的那一行之外,并显示该行之前的内容。
-c --count    # 计算符合范本样式的列数。
-C<显示行数> --context=<显示行数>或-<显示行数> # 除了显示符合范本样式的那一列之外,并显示该列之前后的内容。
-d<进行动作> --directories=<动作>  # 当指定要查找的是目录而非文件时,必须使用这项参数,否则grep命令将回报信息并停止动作。
-e<范本样式> --regexp=<范本样式>   # 指定字符串作为查找文件内容的范本样式。
-E --extended-regexp             # 将范本样式为延伸的普通表示法来使用,意味着使用能使用扩展正则表达式。
-f<范本文件> --file=<规则文件>     # 指定范本文件,其内容有一个或多个范本样式,让grep查找符合范本条件的文件内容,格式为每一列的范本样式。
-F --fixed-regexp   # 将范本样式视为固定字符串的列表。
-G --basic-regexp   # 将范本样式视为普通的表示法来使用。
-h --no-filename    # 在显示符合范本样式的那一列之前,不标示该列所属的文件名称。
-H --with-filename  # 在显示符合范本样式的那一列之前,标示该列的文件名称。
-i --ignore-case    # 忽略字符大小写的差别。
-l --file-with-matches   # 列出文件内容符合指定的范本样式的文件名称。
-L --files-without-match # 列出文件内容不符合指定的范本样式的文件名称。
-n --line-number         # 在显示符合范本样式的那一列之前,标示出该列的编号。
-P --perl-regexp         # PATTERN 是一个 Perl 正则表达式
-q --quiet或--silent     # 不显示任何信息。
-R/-r  --recursive       # 此参数的效果和指定“-d recurse”参数相同。
-s --no-messages  # 不显示错误信息。
-v --revert-match # 反转查找。
-V --version      # 显示版本信息。
-w --word-regexp  # 只显示全字符合的列。
-x --line-regexp  # 只显示全列符合的列。
-y # 此参数效果跟“-i”相同。
-o # 只输出文件中匹配到的部分。
-m <num> --max-count=<num> # 找到num行结果后停止查找,用来限制匹配行数
3.1.2 示例
grep -E "[1-9]+"
# 只输出文件中匹配到的部分 -o 选项
echo this is a test line. | grep -o -E "[a-z]+\."
line.
# 统计文件或者文本中包含匹配字符串的行数 -c 选项:
grep -c "text" file_name
# 输出包含匹配字符串的行数 -n 选项
grep "text" -n file_1 file_2
# 打印样式匹配所位于的字符或字节偏移
#一行中字符串的字符偏移是从该行的第一个字符开始计算,起始值为0。选项  **-b -o**  一般总是配合使用。
echo gun is not unix | grep -b -o "not"
7:not
# 多级目录下递归搜索
grep "text" . -r -n
# -e 匹配多个样式
echo this is a text line | grep -e "is" -e "line" -o
is
is
line
# 只在目录中所有的.php和.html文件中递归搜索字符"main()"
grep "main()" . -r --include *.{php,html}

# 在搜索结果中排除所有README文件
grep "main()" . -r --exclude "README"

# 在搜索结果中排除filelist文件列表里的文件
grep "main()" . -r --exclude-from filelist
3.2 sed
3.2.1 正则表达式
基本正则表达式
-
.,表示匹配任意一个字符,除了换行符,类似 Shell 通配符中的 ?;
-
*,表示前边字符有 0 个或多个;
-
.*,表示任意一个字符有 0 个或多个,也就是能匹配任意的字符;
-
^,表示行首,也就是每一行的开始位置,^abc 匹配以 abc 开头的字符串;
-
$,表示行尾,也就是每一行的结尾位置,}$ 匹配以大括号结尾的字符串;
-
{},表示前边字符的数量范围,{2},表示重复 2 次,{2,}重复至少 2 次,{2,4} 重复 2-4 次;
-
[],括号中可以包含表示字符集的表达式
(二)扩展正则表达式
扩展正则表达式使用频率上没有基本表达式那么高,但依然很重要,很多情况下没有扩展正则是搞不定的,sed 命令使用扩展正则时需要加上选项 -r。
-
?:表示前置字符有 0 个或 1 个;
-
+:表示前置字符有 1 个或多个;
-
|:表示匹配其中的一项即可;
-
():表示分组,(a|b)b 表示可以匹配 ab 或 bb 子串,且命令表达式中可以通过 \1、\2 来表示匹配的变量
-
{}:和基本正则中的大括号中意义相同,只不过使用时不用加转义符号;
3.2.2 语法
sed [option] 'command' filename
command
command 子命令格式:
[地址1, 地址2] [函数] [参数(标记)]
基本子命令
-
替换子命令 s
# 将每行的hello替换为HELLO,只替换匹配到的第一个 $ sed 's/hello/HELLO/' file.txt # 将匹配到的hello全部替换为HELLO,g表示替换一行所有匹配到的 $ sed 's/hello/HELLO/g' file.txt # 将第2次匹配到的hello替换 $ sed 's/hello/A/2' file.txt # 将第2次后匹配到的所有都替换 $ sed 's/hello/A/2g' file.txt # 在行首加#号 $ sed 's/^/#/g' file.txt # 在行尾加东西 $ sed 's/$/xxx/g' file.txt- 多个匹配
# 将1-3行的my替换为your,且3行以后的This替换为That $ sed '1,3s/my/your/g; 3,$s/This/That/g' my.txt # 等价于 $ sed -e '1,3s/my/your/g' -e '3,$s/This/That/g' my.txt -
追加子命令 a
# 将所有行下边都添加一行内容A $ sed 'a A' file.txt # 将文件中1-2行下边都添加一行内容A $ sed '1,2a A' file.txt -
插入子命令 i
-
替换子命令 c
-
删除子命令 d
option
-
-n,表示安静模式。默认 sed 会把每行内容处理完毕后打印到屏幕上,加上选项后就不会输出到屏幕上。
-
-e,如果需要用 sed 对文本内容进行多种操作,则需要执行多条子命令来进行操作;
-
-i,默认 sed 只会处理模式空间的副本内容,不会直接修改文件,如果需要修改文件,就要指定 -i 选项;
-
-f,如果命令操作比较多时,用 -e 会有点力不从心,这时需要把多个子命令写入脚本文件,使用 -f 选项指定执行该脚本;
-
-r:如果需要支持扩展正则表达式,那么需要添加 -r 选项;
3.2.3 数字定址和正则定址
数字定址
# 只将第4行中hello替换为A
$ sed '4s/hello/A/g' file.txt
# 将第2-4行中hello替换为A
$ sed '2,4s/hello/A/g' file.txt
# 从第2行开始,往下数4行,也就是2-6行
$ sed '2,+4s/hello/A/g' file.txt
# 将最后1行中hello替换为A
$ sed '$s/hello/A/g' file.txt
# 除了第1行,其它行将hello替换为A
$ sed '1!s/hello/A/g' file.txt
正则定址
# 将匹配到hello的行执行删除操作,d 表示删除
$ sed '/hello/d' file.txt
# 删除空行,"^$" 表示空行
$ sed '/^$/d' file.txt
# 将匹配到以ts开头的行到以te开头的行之间所有行进行删除
$ sed '/^ts/,/^te/d' file.txt
3.3 awk
- awk会根据空格和制表符,将每一行分成若干字段,依次用$1、$2、$3代表第一个字段、第二个字段、第三个字段等等
- print命令里面,如果原样输出字符,要放在双引号里面。
3.3.1 基本用法
awk action filename
awk '{print $0}' demo.txt
3.3.2 内置函数
变量NF表示当前行有多少个字段,因此$NF就代表最后一个字段
变量NR表示当前处理的是第几行
toupper()用于将字符转为大写
tolower():字符转为小写。
length():返回字符串长度。
substr():返回子字符串。
sin():正弦。
cos():余弦。
sqrt():平方根。
rand():随机数。
3.3.3 示例
# 输出奇数行
$ awk -F ':' 'NR % 2 == 1 {print $1}' demo.txt
root
bin
sync

# 输出第三行以后的行
$ awk -F ':' 'NR >3 {print $1}' demo.txt
sys
sync

$ awk -F ':' '$1 == "root" {print $1}' demo.txt
root

$ awk -F ':' '$1 == "root" || $1 == "bin" {print $1}' demo.txt
root
bin
3.4 find
- 从每个指定的起始点 (目录) 开始,搜索以该点为根的目录树,并按照运算符优先级规则从左至右评估给定的表达式,直到结果确定,此时find会继续处理下一个文件名。
3.4.1 语法
find [-H] [-L] [-P] [-D debugopts] [-Olevel] [起始点...] [表达式]
- -name pattern:按文件名查找,支持使用通配符 * 和 ?。
- -type type:按文件类型查找,可以是 f(普通文件)、d(目录)、l(符号链接)等。
f 普通文件
l 符号连接
d 目录
c 字符设备
b 块设备
s 套接字
p Fifo - -size [+-]size[cwbkMG]:按文件大小查找,支持使用 + 或 - 表示大于或小于指定大小,单位可以是 c(字节)、w(字数)、b(块数)、k(KB)、M(MB)或 G(GB)。
- -mtime days:按修改时间查找,支持使用 + 或 - 表示在指定天数前或后,days 是一个整数表示天数。
- -user username:按文件所有者查找。
- -group groupname:按文件所属组查找
- -depth: 让 find 以深度优先的方式遍历目录树,默认情况下 find 以广度优先方式处理目录树
3.4.2 示例
# 当前目录搜索所有文件,且文件内容包含 “140.206.111.111”
find . -type f -name "*" | xargs grep "140.206.111.111"
# 在/home目录下查找以.txt结尾的文件名,忽略大小写
find /home -iname "*.txt"
# 当前目录及子目录下查找所有以.txt和.pdf结尾的文件
find . -name "*.txt" -o -name "*.pdf"
# 基于正则表达式匹配文件路径
find . -regex ".*\(\.txt\|\.pdf\)$"
# 向下最大深度限制为3
find . -maxdepth 3 -type f
Chapter 4 Analysis Tools
4.1 perf
4.2 valgrind
4.3 tcpdump
4.4 stat相关工具
4.4.1 vmstat
4.4.2 iostat
4.4.3 dstat
4.4.4 pidstat
4.5 strace
4.6 lsof
C++性能优化指南
这里是阅读《C++性能优化指南后的笔记》